Welcome to EspressoDB’s documentation!
Welcome to the documentation of EspressoDB – an open source Python package for managing scientific data using Django.
EspressoDB
EspressoDB is a Python framework designed to organize (relational) data without losing flexibility. It’s objective is to be intuitive and fast.
More specifically, EspressoDB is build on top of the Object-Relational Mapping web framework Django and adds additional convenience functionalities to easily set up your project.
What does EspressoDB provide?
EspressoDB provides an easy to use database interface which helps you to make educated decisions fast.
Once you have created your Python project (e.g., my_project) with EspressoDB
you can use it in all your Python apps to query your data. For example,
import numpy as np from my_project.hamiltonian.models import Contact as ContactHamiltonian # Ask the database for specific entries hamiltonian = ContactHamiltonian.objects.filter(n_sites=20).first() # Use class methods for an intuitive interface ## Print a formatted summary of the table entry print(hamiltonian) ## Allocate an actual matrix for given entry and use it for computations eigs, vecs = np.linalg.eigh(hamiltonian.matrix)
Instances of a
modelsclass are regular classes in Python. You can provide additional class methods for convenience. Also, they know how to talk to the database, e.g., you can query (read) and update (write) your data to a central database.you can generate web-views which summarize your tables and data.
 Because the webpages use a Python API as well, this means that you can completely customize views with code you have already developed.
E.g., you can automate plots and display summaries in your browser.
If you want to, you can also make your web app public (with different layers of accessibility) and share results with others.
Because the webpages use a Python API as well, this means that you can completely customize views with code you have already developed.
E.g., you can automate plots and display summaries in your browser.
If you want to, you can also make your web app public (with different layers of accessibility) and share results with others.
What’s the story behind it?
EspressoDB was developed when we created LatteDB – a database for organizing Lattice Quantum Chromodynamics research. We intended to create a database for several purposes, e.g. to optimize the scheduling of architecture dependent many-node jobs and to help in the eventual analysis process. For this reason we started to abstract our thinking of how to organize physics objects.
It was the goal to have easily shareable and completely reproducible snapshots of our workflow, while being flexible and not restricting ourselves too much – in the end science is full of surprises. The challenges we encountered were
How can we program a table structure which can be easily extended in the future?
How do we write a database such that users not familiar with the database concept can start using this tool with minimal effort?
The core module of LatteDB, EspressoDB, is trying to address those challenges.
Contributing
Thanks for your interest in contributing! There are many ways to contribute to this project. Get started here.
How to use EspressoDB
This section explains how to use EspressoDB to create projects and apps.
It provides a wrapper interface for djangos project creation which streamlines the creation process.
TL;DR
-
espressodb startproject my_project
The following commands must be run in the project root directory:
cd my_project (Optional) Update the configurations of the project in
db-config.yamlandsettings.yaml(Optional) Create a new app
python manage.py startapp my_app
configure it and create new migrations
python manage.py makemigrations
-
python manage.py migrate
(Optional) Launch a local web app
python manage.py runserver
(Optional) Install your project locally to use it in other modules
pip install [--user] [-e] .
For more details how to customize your project, take a look at the how to create the example project guide.
Details
Install EspressoDB
You can pip install this package by running
pip install [--user] espressodb
You can also install the project from source
git clone https://www.github.com/callat-qcd/espressodb.git
cd espressodb
pip install [--user] [-e] .
Start a project
A project is the core module which manages the settings for your (future) tables like connections to the database, security levels and so on.
You can initialize an empty project by running
espressodb startproject my_project
This will create the following folder structure
my_project/
|-- manage.py
|-- db-config.yaml
|-- settings.yaml
|-- setup.py
|-- my_project/
|-- __init__.py
|-- config/
|-- __init__.py
|-- settings.py
|-- tests.py
|-- urls.py
|-- wsgi.py
|-- migrations/
|-- __init__.py
|-- notifications/
|-- __init__.py
|-- 0001_initial.py
Note
EspressoDB makes use of the project structure by, e.g., finding import paths and static files. Thus, unless you know what you are doing, it is recommended to stick to this folder layout.
Configure your project
The settings.yaml and db-config.yaml are convenience files for easy updates (without accidentally committing secret passwords).
Both of them may contain passwords (SECRET_KEY in the settings and database PASSWORD in the db config) and thus you should pay attention if or with whom you want to share them.
The db-config.yaml provides the default database option
ENGINE: django.db.backends.sqlite3
NAME: /path/to/project/my_project/my-project-db.sqlite
The first option specifies the database backend.
As default, it uses the file based sqlite database.
For this case, the name points to the absolute path of the file (which allows interface for external apps).
You can specify different database options like a postgres model in this file (see also the docs).
The settings.yaml specifies the database encryption, which apps your projects will use and, in case you want to, how you want to run the web server
SECRET_KEY: "Sup3r_compl1cated-P4ssw0rd!"
PROJECT_APPS: []
ALLOWED_HOSTS: []
DEBUG: True
Both files are needed and eventually imported by my_project/my_project/config/settings.py.
If you want to learn more or have different setups, feel free to adjust this file with help of the settings documentation.
Create or update the database
After you have created a project for the first time, you have to initialize your tables.
Django provides an interface to manage the communication with the database without you running any SQL commands directly.
Specifically, you can program Python classes, which specify a given table layout, and know how to talk to a database.
This concept is called Object-Relational Mapping (ORM).
These classes are called models and have a one-to-one correspondence to tables within the database.
By default Django provides a few basic models like the User class.
Updating the database with new tables or modifying old ones is a crucial step. If the Python backend encounters tables which do not match what the user specified, this could cause the ORM to fail. To ensure table and code updates are executed in a consistent way Django, implements the following two-step procedure:
Create migrations
Once the Python models have been updated, Django identifies a strategy how the existing tables within the DB must be adjusted to match the new specifications.
E.g., if a column was added, how to populate old entries which did not have this column yet.
If a change is implemented which needs user input, Django will ask you how to proceed.
This update strategy will be summarized in a migration file.
You start this procedure by running
python manage.py makemigrations
In this step, the database is not modified. So if this step fails, nothing crucial has happened yet. However you should make sure that before continuing, everything works as expected.
Migrate changes
To update the database, you have to migrate changes.
This applies the specifications in the migration files and alters your database.
To apply the migrations run
python manage.py migrate
After successfully migrating new or updated models, you are good to go and can for example launch a web app.
For further migration strategies, see also the Django docs.
Launch a local web app
Django provides an easy interface to launch a local web server. Once you project is set up, you can run
python manage.py runserver
to start a local lightweight server which runs by default on localhost: http://127.0.0.1:8000/. EspressoDB provides default views, meaning once your tables have been successfully migrated, you can directly see your project home page. Everyone who has access to this port on your machine can access the launched web page. This means, by default, you are the only one able to see it.
Create a new app
Apps are submodules within your project and implement new tables and other features. To start a new app, run the following command
python manage.py startapp my_app
This will create the new folders and files
my_project/
|-- my_app/
|-- __init__.py
|-- admin.py
|-- apps.py
|-- models.py
|-- tests.py
|-- views.py
|-- templates/
|-- migrations/
|-- __init__.py
Note
EspressoDB makes use of the project and app structure by, e.g., finding import paths and static files. Thus, unless you know what you are doing, it is recommended to stick to this folder layout.
To let your project know that it also has to include the new app, change the settings.yaml to also include
PROJECT_APPS:
- my_project.my_app
Because the project is empty, nothing significant has changed thus far.
To implement your first table, you must adjust the app models.
E.g., to create a table which works with the EspressoDB default features, update my_project/my_app/models.py to
from django.db import models
from espressodb.base.models import Base
class MyTable(Base):
i = models.IntegerField(help_text="An important integer")
This implements a new model with the default columns provided by the EspressoDB base model (e.g., user, last_modified, tag) and adds an integer column called i.
You can find more information about tables in EspressoDB in our example project or take a look at the Django models documentation for a complete reference.
Note
Note that you have to replace models.Model with EspressoDB's Base. Base derives from Django's default models.Model but provides further features needed by EspressoDB.
To update your database you have to (again) create and migrate migrations.
python manage.py makemigrations
python manage.py migrate
After this, you should be able to see a My Table entry within the documentation
python manage.py runserver
and visit http://127.0.0.1:8000/documentation/my_app/.
Install your project locally
The easiest way to let your other Python modules use these tables is to install your project as a pip module (not on Python package index, just in your local path).
To do so, take a look at setup.py, adjust it to your means and run
python -m pip install [--user] [-e] .
The [-e] options symlinks the install against this folder and can be useful incase you want to continue updating this module, e.g., for development purposes.
That’s it.
You can now use your tables in any Python program like
from my_project.my_app.models import MyTable
all_entries = MyTable.objects.all()
for entry in all_entries:
print(entry, entry.tag)
See also the Django query docs for more sophisticated options.
The example project
EspressoDB aims to create projects fast. In this section,
we want to present an example project and a few of EspressoDB’s features.
we guide to the process which creates this project.
What can I do?
EspressoDB aims to create projects fast.
In this section,
we want to present an example project and a few of EspressoDB’s features.
we guide to the process which creates this project.
Install the project
The example project lives in the repository root example/my_project directory.
In order to use it, you have to clone the repository
git clone https://github.com/callat-qcd/espressodb.git
Install the dependencies
cd example/my_project
pip install [--user] -r requirements.txt
And create the project tables
python manage.py migrate
Finally you can launch a local server
python manage.py runserver
and visit the project dashboard at http://127.0.0.1:8000/ (this is the default port).
The public views
After launching a local server
python manage.py runserver
you should be able to have access to five pages:
the project homepage: http://127.0.0.1:8000/
the project apps documentation: http://127.0.0.1:8000/documentation/hamiltonian/
the population views: http://127.0.0.1:8000/populate/
the login page: http://127.0.0.1:8000/login/
the Hamiltonian status page: http://127.0.0.1:8000/hamiltonian/status/
All but the Hamiltonian status page are default views of EspressoDB. Once you start your project, you will have a homepage, the population views, and the admin pages. Whenever you create a new app, EspressoDB directly scans your app and adds documentations to the doc page.
The only view which is specifically implemented for the project is the Hamiltonian status page.
All of the pages are completely customizable.
On the bottom of the page, the current version of EspressoDB and the repo is displayed.
The home page

The homepage is just a plain page which should summarize infos. For this project, there are no specific informations here.
The doc page

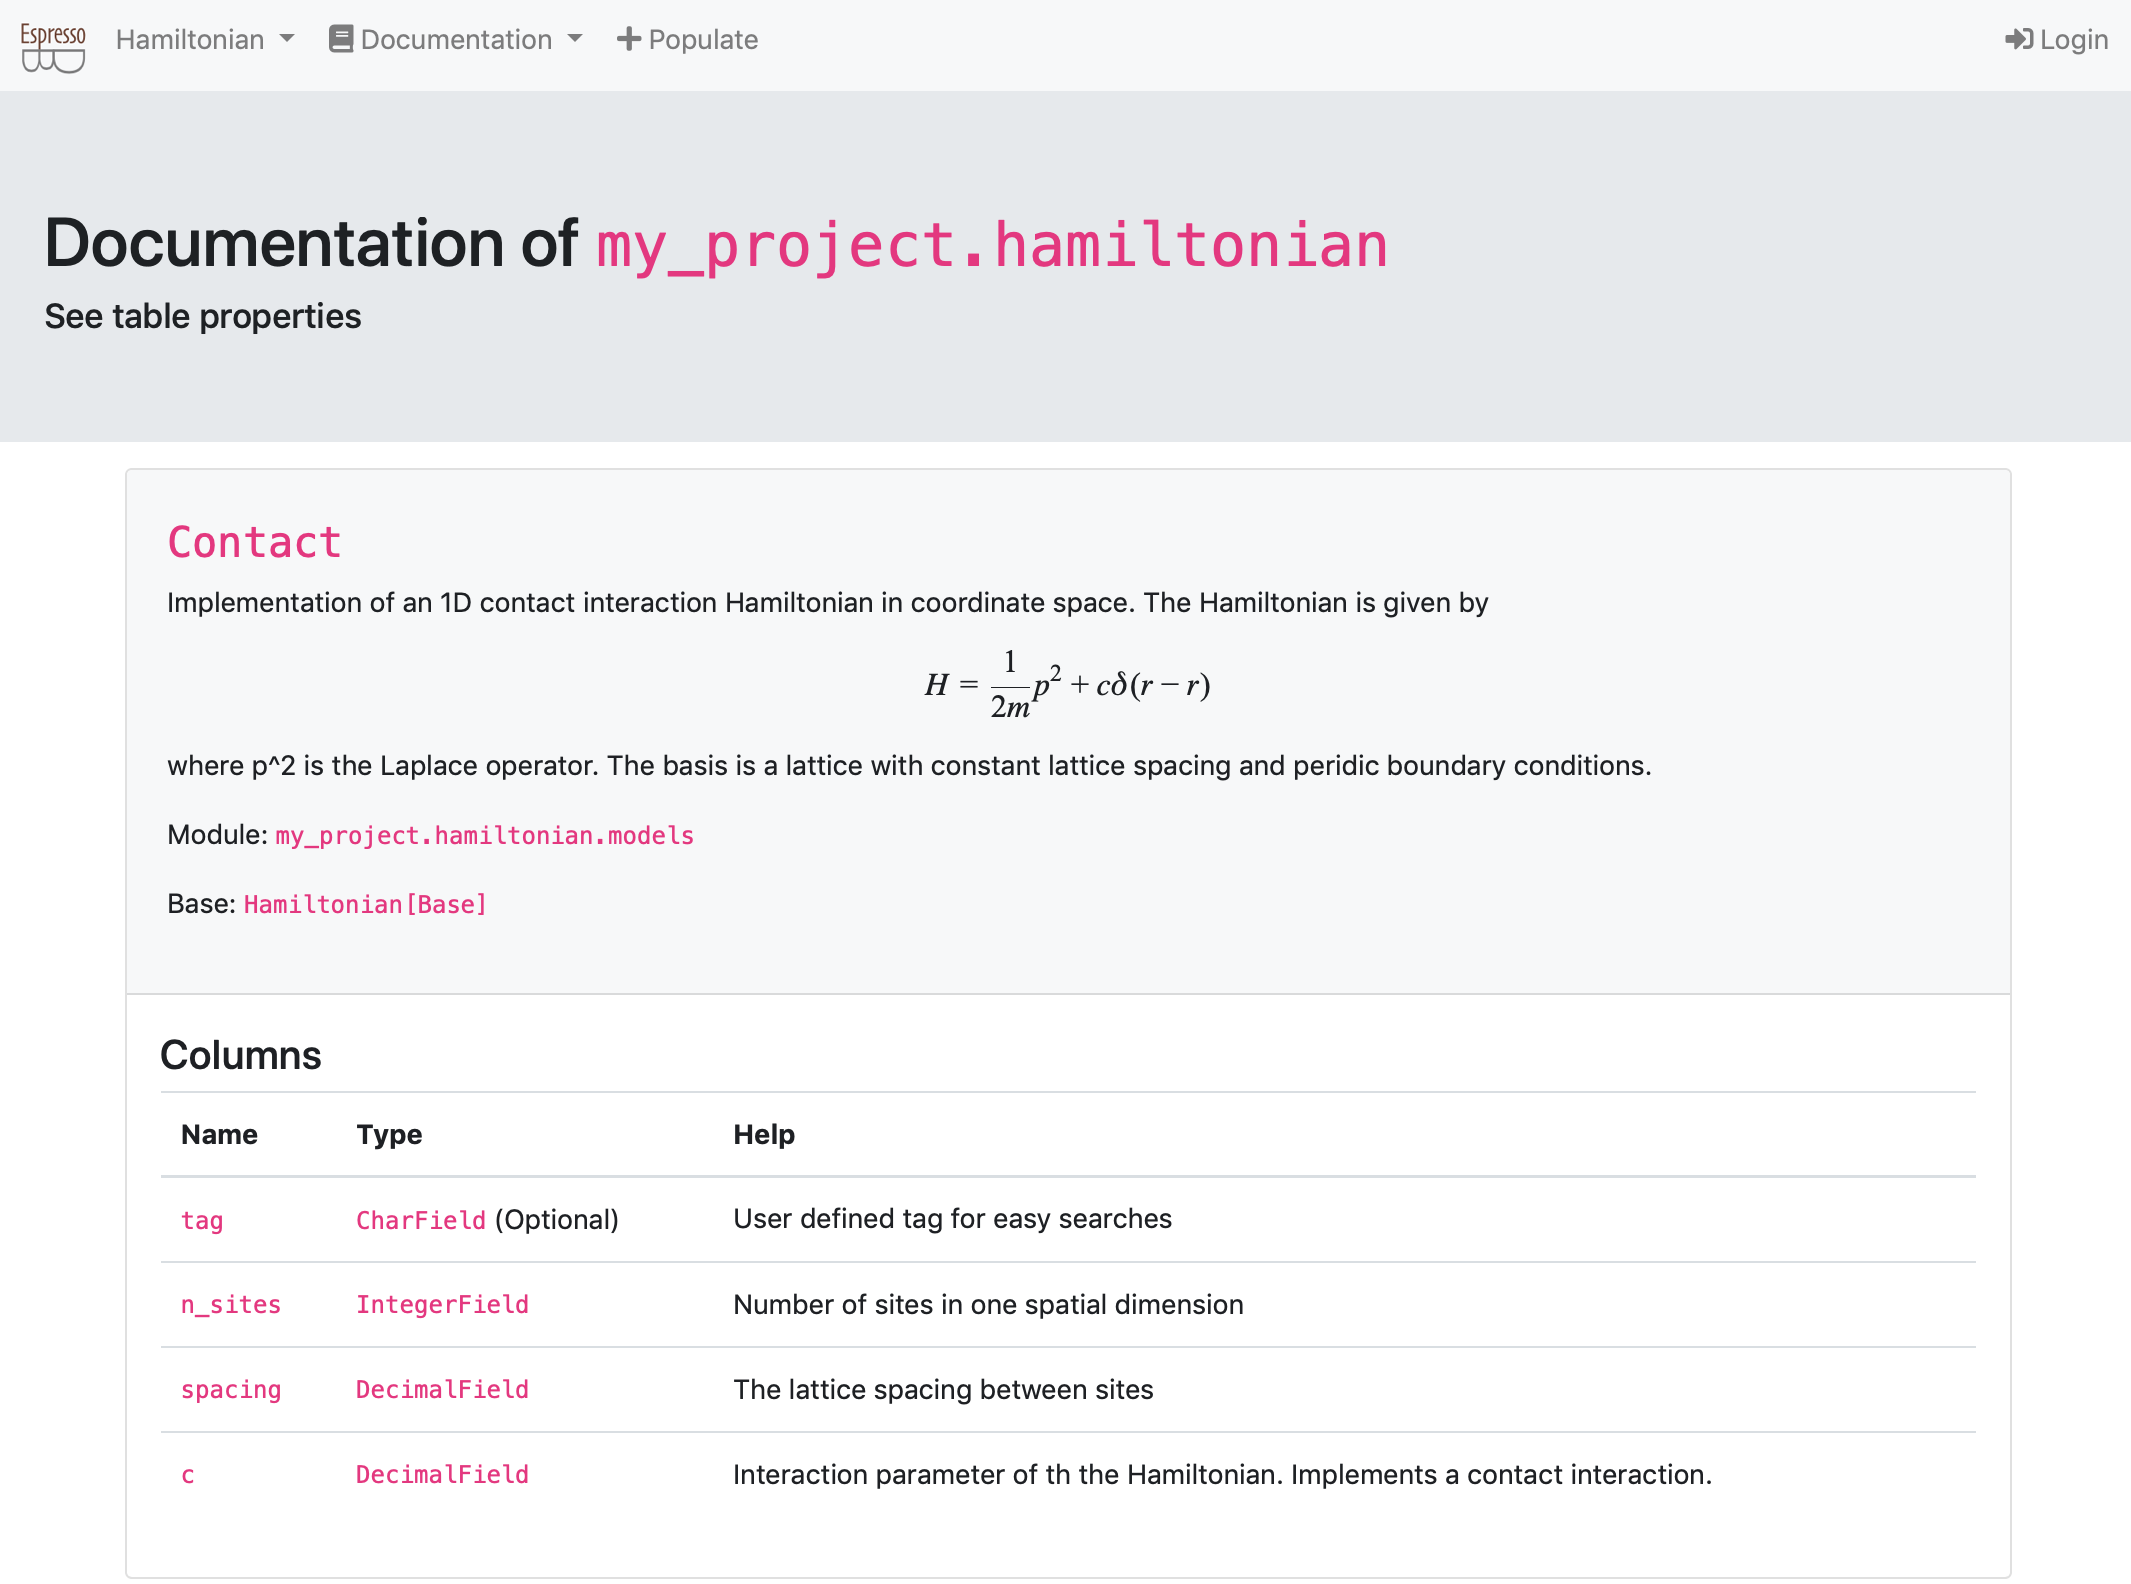
For all of the models present in the project apps, this view automatically generates a documentation page. E.g., the above picture is generated from the
class Contact(Hamiltonian)
class in my_project/hamiltonian/models.py.
For each app, each model / table has an entry on this page which describe the columns of the table. E.g., the pages lists the name of the columns, the type and whether they are optional or have default values and the help text.
The population views
The population views are dynamic forms which provide scripts to populate (existing) tables.
These views query the user which table they intend to populate and find nested dependencies (e.g. the Eigenvalue table needs to know which Hamiltonian they come from).

Once all dependencies are identified, they return a Python script which can be run after it’s arguments are entered.

The login page

The login page logs you in as a registered user. See also the private views for what to expect there.
The Hamiltonian status page

The status page displays informations about one of the tables called Contact[Hamiltonian].
It displays a dynamically generated grid plot which visualizes the status of computations.
A green field corresponds to completed jobs, a red field to not finished jobs.
A mouse-over effect displays further information.
Once the database is updated (and the web page reloaded) the plot will also update.
This view is the only view which comes not as a default when initializing a project with EspressoDB.
The private views
By default, views you create are public – any user who has access to the address where the web page is launched, is able to see the content. It is also possible to require the user to be logged in (and have specified permissions) to see views.
Since you have just created the database, there is no user specified. You can create a new user by running
python manage.py createsuperuser
This information is stored (encrypted) in the database my_project.sqlite.
Once you have logged in, you will be able to access two more pages:

The notifications page: http://127.0.0.1:8000/notifications/
And the admin pages: http://127.0.0.1:8000/admin/
Both pages are present by default once you create your project with EspressoDB.
The notifications page

The notifications page works similarly to Python’s logging module.
You can create a notifier instance and directly log messages to the database
from espressodb.notifications import get_notifier
NOTIFIER = get_notifier()
NOTIFIER.info("Hello world!")
which can be viewed on the notifications page. Different to logging you can also specify groups which are allowed to see this message – a user not present in this group will not be able to see them.
The admin pages

As the name suggests, the admin pages have full management control over all other pages (unless you restrict your database access).
You can search, add, change and delete existing entries from this page.
By default, all models specified in your PROJECT_APPS will be listed here.

Using your project in external modules
There are two ways to use your project in an external module or script
Place your external script in the project root directory
Install your module
Installing your module
On project creation, EspressoDB also creates a setup.py file in the project root directory.
After adjusting this file to your needs, you can run
python -m pip install [--user] [-e] .
This will place my_project in your Python path.
The [-e] options symlinks the install against this folder and can be useful incase you want to continue updating this module, e.g., for development purposes.
You can also run this in a virtual environment.
Using tables
Tables or models on the Python side are classes which can be adjusted to your means. Each row in the table can be loaded into a Python class instance. Each column in the table will be an attribute of the instance. You can thus filter the database to extract the class you where interested in, adjust its attributes and push it back to the database. For example
from my_project.hamiltonian.models import Contact as ContactHamiltonian
...
# Search all the table entries for this value and give me the first match
hamiltonian = ContactHamiltonian.objects.filter(
n_sites=10, spacing=0,1, c=-1
).first()
# Adjust the attribute
hamiltonian.c = -2
# And push back the modifications to the table
hamiltonian.save()
The results of this action will thus also be visible from the web view.
The add_data.py script
The example project comes with a script add_data.py.
This script defines a range of computations for which eigenvalues of the contact hamiltonian will be computed.
It checks if for a given hamiltonian, the eigenvalues are already present.
If for a specific hamiltonian, you have less eigenvalues then expected, it assumes that the computation failed,
deletes existing eigenvalues from the database and recomputes them.
It also logs creation and deletion events using the espressodb.notifications module.
After you have run the script, you can revisit the homepage and check the status or notifications page.
How do I set up the example project myself?
This section is a step by step tutorial how to create the my_project project contained in the example folder yourself.
Create your own project
The starting point is that you have installed EspressoDB.
Start the project
Go to your directory of choice and type
$ espressodb startproject my_project
This will return
Setting up new project `my_project` in `/path/to/project`
-> Creating `db-config.yaml` in the project root dir `/path/to/project/my_project`
Adjust this file to establish a connection to the database
-> Creating `settings.yaml`. Adjust this file to include later apps
-> Done!
-> You can now:
1a. Migrate models by running `python manage.py migrate`
1b. and launch a web app by running `python manage.py runserver`
2. Add new models using `python manage.py startapp {APP_NAME}`
3. Run `python -m pip install [--user] [-e] .` in the project root directory to add your package to your python path.
See also `/path/to/project/my_project/setup.py`.
and create the folder structure of the project.
You can find two files in this directory:
db-config.yamlwhich describes how to connect to a database andsettings.yamlwhich describes how to encrypt passwords before entering in the DB, which apps are installed and how to run the web interface.
Both files are important in the sense that they possibly contain sensitive information.
The SECRET_KEY in settings.yaml and the database access in db-config.yaml.
You should think about with whom you want to share those files.
For now, the database will be a local SQLite file located at /path/to/project/my_project/my_project-db.sqlite which is generally not encrypted.
Let’s create this database.
To verify that everything worked, enter the directory, apply migrations and start a local server
$ cd my_project
$ python manage.py makemigrations
No changes detected
$ python manage.py migrate
Operations to perform:
Apply all migrations: admin, auth, contenttypes, notifications, sessions
Running migrations:
Applying contenttypes.0001_initial... OK
Applying auth.0001_initial... OK
Applying admin.0001_initial... OK
Applying admin.0002_logentry_remove_auto_add... OK
Applying admin.0003_logentry_add_action_flag_choices... OK
Applying contenttypes.0002_remove_content_type_name... OK
Applying auth.0002_alter_permission_name_max_length... OK
Applying auth.0003_alter_user_email_max_length... OK
Applying auth.0004_alter_user_username_opts... OK
Applying auth.0005_alter_user_last_login_null... OK
Applying auth.0006_require_contenttypes_0002... OK
Applying auth.0007_alter_validators_add_error_messages... OK
Applying auth.0008_alter_user_username_max_length... OK
Applying auth.0009_alter_user_last_name_max_length... OK
Applying auth.0010_alter_group_name_max_length... OK
Applying auth.0011_update_proxy_permissions... OK
Applying notifications.0001_initial... OK
Applying sessions.0001_initial... OK
The last command will create the database my_project-db.sqlite with EspressoDB’s default tables.
After this you can run
$ python manage.py runserver
Watching for file changes with StatReloader
Performing system checks...
System check identified no issues (0 silenced).
October 07, 2019 - 17:28:59
Django version 2.2.2, using settings 'my_project.config.settings'
Starting development server at http://127.0.0.1:8000/
Quit the server with CONTROL-C.
And visit http://127.0.0.1:8000/ to see the for now empty homepage

Create the hamiltonians app
Creating the infrastructure
For now your project is basically empty. To implement new tables, you have to create apps – which you can view as python sub modules of your project.
To do so, you have to run
$ python manage.py startapp hamiltonian
App `hamiltonian` was successfully created. In order to install it
1. Adjust the app (directory `/path/to/project/my_project/my_project/hamiltonian`)
2. Add `my_project.hamiltonian` to the `PROJECT_APPS` in `settings.yaml`
3. Run `python manage.py makemigrations`
4. Run `python manage.py migrate`
This will create the folder structure for the my_project.hamiltonian submodule.
To let Django know that you want to include this app in your project, modify settings.yaml to
SECRET_KEY: "{sup3r-secr3t-p4ssw0rd}"
PROJECT_APPS:
- my_project.hamiltonian
ALLOWED_HOSTS: []
DEBUG: True
Because you have not added new tables yet, there is nothing to migrate.
The web view however will now have a new tab http://127.0.0.1:8000/documentation/hamiltonian/ which will find the new app with no tables.

Creating tables
Tables are implemented in the models.py file within each app.
To implement your first table adjust the my_project/hamiltonian/models.py to
"""Models of hamiltonian
"""
# Note: if you want your models to use espressodb features, they must inherit from Base
from django.db import models
from espressodb.base.models import Base
class Contact(Base):
r"""Implementation of an 1D contact interaction Hamiltonian in coordinate space.
The Hamiltonian is given by
$$
H = \frac{1}{2 m} p^2 + c \delta(r - r)
$$
where \( p^2 \) is the Laplace operator.
The basis is a lattice with constant lattice spacing and periodic boundary conditions.
"""
n_sites = models.IntegerField(
verbose_name="Number of sites",
help_text="Number of sites in one spatial dimension",
)
spacing = models.DecimalField(
verbose_name="lattice spacing",
max_digits=5,
decimal_places=3,
help_text="The lattice spacing between sites",
)
c = models.DecimalField(
verbose_name="Interaction",
max_digits=5,
decimal_places=3,
help_text="Interaction parameter of th the Hamiltonian."
" Implements a contact interaction.",
)
class Meta:
unique_together = ["n_sites", "spacing", "c"]
The inheritance of EspressoDB’s Base class
class Contact(Base):
allows to utilize EspressoDB’s features like the population view or auto documentation. Each class will correspond to a table in your database.
Each class attribute which is associated with a models.Field will be a column of the table.
By default Base adds the following columns user, tag, last_modified.
The user is set whenever EspressoDB identifies a logged in user (e.g., from your database connection file), the tag field is a string you can use for searching the database.
This will become relevant for inheritance later on.
The last_modified field is updated to the current time whenever a table row is changed (or saved for that matter).
For this specific class, you add the following three columns n_sites, spacing, and c.
We have used DecimalFields instead of FloatFields because this allows to use the equal expression to check numbers.
Particularly, the last two lines
class Meta:
unique_together = ["n_sites", "spacing", "c"]
tell the table that no matter what, it does not allow to insert an entry in the database if ther already is an entry with the same exact n_sites, spacing, and c.
Furthermore, the doc string of the class and the the help text of the fields are used to generate the auto documentation.
To migrate the new tables in the database, you have to run
$ python manage.py makemigrations
Migrations for 'hamiltonian':
my_project/hamiltonian/migrations/0001_initial.py
- Create model Contact
which creates the migrations file my_project/hamiltonian/migrations/0001_initial.py.
This file summarizes the strategy how to update the database.
Next, to actually insert the empty table, you have to run
$ python manage.py migrate
Operations to perform:
Apply all migrations: admin, auth, contenttypes, hamiltonian, notifications, sessions
Running migrations:
Applying hamiltonian.0001_initial... OK
Now you have implemented the tables.
This change is reflected in your documentation view documentation view:

The webpage uses katex to render the latex expressions.
You can use $$ for equations and \( for inline math.
Adding data
This section shows you how to populate your database.
There are basically two options:
you can use the admin page to adjust entries.
you can write your own script to add data.
The admin page
To have access to the admin page, you should first create a super user. This is done by
$ python manage.py createsuperuser
Once you have done that, you can see the admin area after logging in: http://127.0.0.1:8000/login/. E.g., your menu bar should have two more links: Notifications: http://127.0.0.1:8000/notifications/ and admin: http://127.0.0.1:8000/admin/.
On the admin page, you see a summary of all your tables.
Particularly, on the contact hamiltonian admin: http://127.0.0.1:8000/admin/hamiltonian/contact/, you find an empty table.
To create an entry, click on add entry and fill out the forms and save.
E.g., after choosing n_sites=10, spacing=0.1 and c=-1.0, your table should look like this

Note
EspressoDB adds all models to the admin page by default.
If you do not want to have this behavior, you have to adjust my_project/hamiltonian/admin.py
Data scripts
Next we provide a script which adds missing data to the database.
To simplify this approach, EspressoDB provides population views which help you code up scripts with nested dependencies.
Since there is just one table without dependencies, the result is straight forward.
E.g., if you select Contact[Base], you will obtain
from my_project.hamiltonian.models import Contact as hamiltonian_Contact
hamiltonian_Contact.get_or_create(
n_sites=..., # Number of sites in one spatial dimension
spacing=..., # The lattice spacing between sites
c=..., # Interaction parameter of the Hamiltonian. Implements a contact interaction.
tag=..., # (Optional) User defined tag for easy searches
)
In principle, you can just fill out the blanks and run this script.
We want to modify this script a little bit to emphasize the logic and a potential use case.
To do so, create the script add_data.py in the project root directory.
from itertools import product
import numpy as np
from my_project.hamiltonian.models import Contact as ContactHamiltonian
RANGES = {
"spacing": np.linspace(0.1, 1.0, 10),
"n_sites": np.arange(10, 51, 5),
"c": [-1],
}
def main():
for values in product(*RANGES.values()):
spacing, n_sites, c = values
print(
"Start to compute eigenvalues for"
f" spacing={spacing}, n_sites={n_sites} and c={c}."
)
hamiltonian = ContactHamiltonian.objects.filter(
n_sites=n_sites, spacing=spacing, c=c
).first()
if not hamiltonian:
hamiltonian = ContactHamiltonian(n_sites=n_sites, spacing=spacing, c=c)
print(f" Creating table entry for {hamiltonian}")
hamiltonian.save()
if __name__ == "__main__":
main()
With
ContactHamiltonian.objects.filter(n_sites=n_sites, spacing=spacing, c=c)
we ask the database for all entries which fulfill the above criteria.
Since we have implenented a unique constrained, the returned queryset consists of either one or zero objects.
With the first() method we therefore receive a ContactHamiltonian instance or None.
If we do not have an entry in the database, we want to create one. First we want to create a Python instance.
hamiltonian = ContactHamiltonian(n_sites=n_sites, spacing=spacing, c=c)
This does not touch the database. Only if we call save, the entry is inserted.
hamiltonian.save()
If this entry was present, this would raise an error because of the unique constrained.
Note
Django also provides a shortcut for this procedure with ContactHamiltonian.objects.get_or_create
where an instance and a boolean is returned. The boolean is true whenever an entry was created.
Once you run this script, you will populate your database
$ python add_data.py
Start to compute eigenvalues for spacing=0.1, n_sites=10 and c=-1.
Start to compute eigenvalues for spacing=0.1, n_sites=15 and c=-1.
Creating table entry for Contact[Base](n_sites=15, spacing=0.1, c=-1)
...
Because the first entry was already added by hand, it is skipped. The rest will be inserted accordingly. Now, you should be able to see 90 entries on the admin page.
Providing short cuts with class methods
Because the tables are implemented by Python classes, you can provide additional functionality.
E.g., by default, EspressoDB’s Base class provides a descriptive __str__ method.
Since we want to eventually compute eigenvalues of the Hamiltonian, we want to provide an API to compute a matrix representation of the Hamiltonian.
For example, we can add the following methods to Contact in my_project/hamiltonian/models.py
import numpy as np
from django.db import models
from espressodb.base.models import Base
class Contact(Base):
...
@property
def mass(self) -> float:
return 0.5
@property
def matrix(self) -> np.ndarray:
"""Returns the matrix corresponding to the Hamiltonian
"""
spacing = float(self.spacing)
matrix = np.zeros([self.n_sites, self.n_sites], dtype=float)
fact = 1 / 2 / self.mass / spacing ** 2
# Derivative with periodic boundary conditions
for n in range(self.n_sites):
matrix[n, n] += -2 * fact
matrix[n, (n + 1) % self.n_sites] += fact
matrix[n, (n - 1) % self.n_sites] += fact
matrix[0, 0] += float(self.c) / spacing
return matrix
Since we always expect to have the same mass, this mass is not a column but a instance property.
Also note that the spacing and c column values are cast to a float because they were stored as a DecimalField.
To test if it works, start a Python shell (by default, Django will use IPython or bpython if either is installed)
python manage.py shell
and test run following code
[1] from my_project.hamiltonian.models import Contact
[2] h = Contact.objects.first()
[3] h.matrix # this is a numpy array
Note
Note that since we only have modified the Python model for the table but not the actual table (e.g., columns), we do not have to migrate changes.
Adding tables with relationships
Updating the models
Next we want to prepare actual computations.
For example, if we are interested in storing eigenvalues, we should create a new table for them in my_project.hamiltonian.models.py
...
class Eigenvalue(Base):
"""Model which stores diagonalization information for a given Hamiltonian
"""
hamiltonian = models.ForeignKey(
Contact,
on_delete=models.CASCADE,
help_text="Matrix for which the eigenvalue has been computed.",
)
n_level = models.PositiveIntegerField(
help_text="The nth eigenvalue extracted in ascending order."
)
value = models.FloatField(help_text="The value of the eigenvalue")
class Meta:
unique_together = ["hamiltonian", "n_level"]
Similar to the Contact model, we have a PositiveIntegerField which enumerate the eigenvalues and a value field, now being a FloatField, as we do not use it for unique constraint comparisons.
The hamiltonian field, a ForeignKey field, points to the Contact table.
On the Python side, this would correspond to
e = Eigenvalue.objects.first()
e.hamiltonian # this is a contact hamiltonian class instance
Also, a backwards access is provided
h = Contact.objects.first()
h.eigenvalue_set.all()
would return of all eigenvalues associated with the hamiltonian.
The on_delete specifies what happens if a hamiltonian associated with eigenvalues is deleted.
In particularly, the models.CASCADE means if you delete a hamiltonian you also delete all associated eigenvalues.
Since now the table structure was modified, changes need to be migrated
$ python manage.py makemigrations
Migrations for 'hamiltonian':
my_project/hamiltonian/migrations/0002_eigenvalue.py
- Create model Eigenvalue
and
$ python manage.py migrate
Operations to perform:
Apply all migrations: admin, auth, contenttypes, hamiltonian, notifications, sessions
Running migrations:
Applying hamiltonian.0002_eigenvalue... OK
Updating the run script
We now want to extend the script to export eigenvalues in case computations are non-existent or incomplete. Non-existent is defined by: “We have no eigenvalues” for a given Hamiltonian, incomplete means: “We find less eigenvalues then expected”.
This logic is implemented by adjusting the main function in add_data.py:
...
from my_project.hamiltonian.models import Eigenvalue
def main():
for values in product(*RANGES.values()):
...
compute_entries = True
eigenvalues = Eigenvalue.objects.filter(hamiltonian=hamiltonian)
if eigenvalues.count() == n_sites:
compute_entries = False
else:
print(" Eigenvalues incomplete. Deleting old computation.")
eigenvalues.delete()
if compute_entries:
print(" Computing eigenvalues")
eigs, _ = np.linalg.eigh(hamiltonian.matrix)
print(" Preparing export of eigenvalues")
for n_level, value in enumerate(eigs):
Eigenvalue.objects.create(hamiltonian=hamiltonian, n_level=n_level, value=value)
print("Done")
Running this script will compute all the eigenvalues.
Note
EspressoDB automatically stores `user` and `last_modified` information for each entry. In some cases it might be desirable to also store code revision information. This can be done by specifying the `tag` column. See also [the `pre_save` functionality.](../../features/pre-save.md).
Creating web views for summaries
Views are Python objects which provide information for html templates. E.g., they query the database and return strings to be rendered in your browser. When you enter an url in your browser, Django figures out which Python object to call which knows which template to render.
EspressoDB implements default views like the project homepage called which is rendered by the index.html template.
Adjusting the index template
When looking for the index template, Django first checks your project template directories, e.g., my_project/hamiltonian/templates/ and then enters EspressoDB’s template dirs.
It renders the first template which matches the specification.
Thus, when you create my_project/hamiltonian/templates/index.html, you will overwrite the default index page.
Here is an example of how to overwrite the index page.
{% extends 'base.html' %}
{% block content %}
<div class="jumbotron">
<h1>Welcome to my Project</h1>
<h5>This page is generated by the template <code>my_project/hamiltonian/templates/index.html</code> view</h2>
<p>
See also the
<a href="https://docs.djangoproject.com/en/dev/ref/templates/language/">
the Django template documentation
</a>
how templates work.
</p>
</div>
<div class="container">
<p>{% lorem %}</p>
</div>
{% endblock %}
This will adjust the index page to

Content with {% ... %} or {{ ... }} will be parsed by the view.
E.g., {% ... %} denote template tags which can be loops, if statements and more.
The {{ ... }} templates will render variables.
Most importantly, for this template are the texts {% extends 'base.html' %}, which tells that it should use the base.html template and extend it.
Thus the link navbar and further html content will be present without you having to write anything.
The {% block content %} and {% endblock %} denotes that within the base.html template, the content between the same exact blocks will be replaced with what you want to render.
See also the Django docs for more information on templates.
Last but not least, EspressoDB comes with a few default css and javascript packages like KaTeX to render equations and Bootstrap 4 for having nice looking responsive webpages with minimal effort.
Views with plots
A nice feature of the Python backend is that you can directly export your plots to a homepage. Whenever new data is added, your plot is dynamically updated. So a possible plot page for this project would be a status view which summaries for which Hamiltonian all of the eigenvalues have been computed and which computations need to be repeated.
It is possible to just use matplotlib, store images dynamically and display them in your view. In this example we have decided to use Bokeh as it allows to have dynamic plots, which allow to, e.g., to zoom, or use mouse over effects on the web view (without storing images in an intermediate step).
To prepare the usage, you should install
pip install bokeh
It is good practice to place all dependencies in the project requirements.txt file as well.
Creating a template view
We first start with setting up the view
Within the my_project/hamiltonian/views.py add the following lines
from django.views.generic.base import TemplateView
from my_project.hamiltonian.models import Contact as ContactHamiltonian
class HamiltonianStatusView(TemplateView):
template_name = "status.html"
model = ContactHamiltonian
def get_context_data(self, **kwargs):
context = super().get_context_data(**kwargs)
context["model"] = self.model
return context
The
TemplateViewclass is a class with streamlines generating views.The
template_name = "status.html"tells Django to look for a file calledstatus.htmlto render this viewThe
get_context_datamethod provides additional information to the rendering. E.g., that the model we are using is aContactHamiltonian. We overload the default method to guarantee that we do not eliminate other needed information.
Creating the template
Next we actually have to create the to be rendered template.
To do so, create the file my_project/hamiltonian/templates/status.html and add the following code
{% extends 'base.html' %}
{% block content %}
<div class="jumbotron">
<h1><code>{{model}}</code> Status</h1>
<h5>This page summarizes the status of <code>{{model}}</code> computations</h2>
<p>
A job is considered done if, for given parameters, one has as many eigenvalues stored in the database as one has sites.
</p>
</div>
{% endblock %}
The {{model}} now make use of the context parameter we have added (and will be rendered by the str(ContactHamiltonian) Python method).
Update the urls
To view this page online, we have to let Django know where to find it.
This is done by adjusting my_project/hamiltonian/urls.py to include the following lines
from django.urls import path
from my_project.hamiltonian.views import HamiltonianStatusView
app_name = "hamiltonian"
urlpatterns = [path("status/", HamiltonianStatusView.as_view(), name="status")]
E.g., when you visit http://127.0.0.1:8000/hamiltonian/status/, the HamiltonianStatusView.as_view() method is called, which renders the template.
By default, EspressoDB scans all your app directories and adds links to the navbar.
Thus, you should now be able to obtain the following web view

Preparing data
Next we want to prepare data for the status view
...
from my_project.hamiltonian.models import Eigenvalue
class HamiltonianStatusView(TemplateView):
...
def prepare_data(self) -> "DataFrame":
hamiltonians = self.model.objects.all()
eigenvalues = Eigenvalue.objects.filter(hamiltonian__in=hamiltonians)
level_count = (
eigenvalues.to_dataframe(fieldnames=["hamiltonian__id", "n_level"])
.rename(columns={"hamiltonian__id": "id"})
.groupby(["id"])
.count()
)
df = (
hamiltonians.to_dataframe(fieldnames=["id", "spacing", "n_sites", "c"])
.set_index("id")
.join(level_count, on="id")
)
df["done"] = df["n_sites"] == df["n_level"]
df["color"] = "green"
df["color"] = df.color.where(df.done, "red")
return df
By default EspressoDB queries can be converted to Pandas DataFrames using django-pandas this simplifies the logic of this code:
We get all Hamiltonians for the specified
self.modelWe find all eigenvalues associated with the Hamiltonians
For each hamiltonian (id), we count the number of associated entries
We join the count information with the Hamiltonian information
We define that a job is done if the numbers of sites is the same as the numbers of eigenvalues
We add a color column corresponding to the “done” status
Preparing the plot
Next we create a Bokeh grid plot within the status view class which will take the prepared DataFrame as input
...
from bokeh.plotting import figure
class HamiltonianStatusView(TemplateView):
...
@staticmethod
def prepare_figure(data: "DataFrame") -> "Figure":
fig = figure(
x_axis_location="above",
tools="hover",
tooltips=[
("Paramaters", "spacing = @spacing{(0.3f)}, # sites = @n_sites"),
("Count", "@n_level/@n_sites "),
("Interaction", "c = @c "),
],
width=600,
height=600,
)
fig.rect(
"spacing",
"n_sites",
width=0.09,
height=4.6,
source=data,
fill_color="color",
legend="done",
)
fig.xaxis.axis_label = "spacing [fm]"
fig.xaxis.axis_label_standoff = 10
fig.yaxis.axis_label = "# sites"
fig.yaxis.axis_label_standoff = 10
fig.outline_line_color = None
fig.grid.grid_line_color = None
fig.axis.axis_line_color = None
fig.axis.major_tick_line_color = None
fig.axis.minor_tick_line_color = None
fig.x_range.range_padding = 0.0
fig.y_range.range_padding = 0.0
return fig
Wrapping things together
To let the template know that we have created a plot, we need to pass the infromation to the context.
Thus we have to update the previously written get_context_data method
...
from bokeh.embed import components
from bokeh import __version__ as bokeh_version
class HamiltonianStatusView(TemplateView):
model = ContactHamiltonian
template_name = "status.html"
def get_context_data(self, **kwargs):
context = super().get_context_data(**kwargs)
df = self.prepare_data()
fig = self.prepare_figure(df)
script, div = components(fig)
context["script"] = script
context["div"] = div
context["model"] = self.model
context["bokeh_version"] = bokeh_version
return context
The bokeh.embed.components transforms our figure into html and javascript objects which the webpage can render.
Furthermore, we need the bokeh_version to ensure that your Python bokeh installation matches the Bokeh javascript version.
Finally, we need to let the template know how to render the plot.
The new status.html should look like this
{% extends 'base.html' %}
{% block head-extra %}
<link href="https://cdn.pydata.org/bokeh/release/bokeh-{{bokeh_version}}.min.css" rel="stylesheet" type="text/css">
<link href="https://cdn.pydata.org/bokeh/release/bokeh-widgets-{{bokeh_version}}.min.css" rel="stylesheet" type="text/css">
<script defer src="https://cdn.pydata.org/bokeh/release/bokeh-{{bokeh_version}}.min.js"></script>
<script defer src="https://cdn.pydata.org/bokeh/release/bokeh-widgets-{{bokeh_version}}.min.js"></script>
<script defer src="https://cdn.pydata.org/bokeh/release/bokeh-tables-{{bokeh_version}}.min.js"></script>
{% endblock%}
{% block content %}
<div class="jumbotron">
<h1><code>{{model}}</code> Status</h1>
<h5>This page summarizes the status of <code>{{model}}</code> computations</h2>
<p>
A job is considered done if, for given parameters, one has as many eigenvalues stored in the database as one has sites.
</p>
</div>
<div class="container">
<h1>Grid view of executed jobs</h1>
{{div|safe}}
</div>
<div class="container my-4">
<p>Feel free to visit the <a href="{% url 'admin:index' %}">admin page</a> and add or delete entries for eigenvalues or hamiltonians</p>
<p>Once entries are missing, you can rerun <code>add_data.py</code> to fill up this view again.</p>
</div>
{{script|safe}}
{% endblock %}
In the {% block head-extra %}, we have loaded the CSS and javascript file version of Bokeh.
We have decided to not included it ourselves (meaning on you machine), as this allows you to install any Bokeh version you like.
But therefore they will be downloaded once you view this page.
Furthermore, we have added the additional |sage template filter for {{div|safe}} and {{script|safe}}.
This means that Django should trust this source and actually execute html / javascript statements.
Without that, the template variables would not be rendered and presented as raw code.
If you now visit the status page, you should either see a completely red or completely green status report, depending on if you have run the updated eigenvalues script

You can now play around and delete some hamiltonians or eigenvalues, e.g., from the admin page and rerun the computation script.
Summary
The final source code for this example can also be found in the EspressoDB repository.
FAQ
Q: Why (or when) should I use EspressoDB?
If you feel that having a dynamic, systematic but also flexible interface to data saves your time, EspressoDB might be able to help out. EspressoDB provides a programmatic interface to relational databases (you can search nested tables with one line of Python) which is
easy to use (no prior knowledge of SQL required)
easy to set up (coding up tables equates to writing classes)
flexible (possible to change tables which contain data)
scalable (fast searches and concurrent access from remote locations)
This is realized by extending the Django web framework to streamline the process of creating the database interface while hiding details behind the scenes.
Q: How do I interact with EspressoDB projects?
The interaction with EspressoDB projects happens on three layers:
Project development (admin like)
You create and develop your EspressoDB project by designing tables and interfacesData interaction (user like)
You import your project to query and push dataData presentation (visitor like)
You access (pre-defined) web pages which visualize data
Q: What should I know to get started with EspressoDB?
Once the project has been set up, users have standardized and documented access to data.
Querying and pushing data requires minimal knowledge of object-oriented programming in Python.
This interface is realized through intuitive methods like obj = queryset.filter(n=1) or obj.save().
The project development layer requires more technical expertise. For simple EspressoDB projects, experience with object-oriented programming in Python and minimal command-line knowledge is helpful. Even without prior knowledge of Django is possible to set up projects in a few minutes. Because tables correspond to classes, you do not have to write any SQL to interface with the database. EspressoDB provides default web views and you can start a local server within one command.
For more collaborative approaches, knowledge about how to set up databases–“what are good table layouts and how to connect to the database?”–simplify setting up projects. Knowledge about Django is helpful if you want to create more sophisticated project layouts or custom-tailored frontend access.
Q: What are possible deployment scenarios?
In the scenario where updates of data happen less frequently and you just want to provide easy access to the data, a file-based SQLite database backend might do the job. Once the tables are ready and the database is populated, you can share your project and (a copy of) this file. You also can launch a web server interfacing with this file.
In a more dynamic scenario where collaborative access is important, we recommend using a MySQL, PostgresSQL or other relational database management systems.
Q: Who can access the data which is stored using EspressoDB?
This depends on the deployment scenario. In general, all data is stored in the database you specify in your settings. Every entity which has access to the database, whether it is direct access or indirect access through your EspressoDB project, can potentially interact with the data.
For example, if data is stored in an SQLite file, everyone who has read (and write) access to this file can interface it. If you host a database accessible through a remote connection, everyone with the required credentials has access to this database. Both of these statements are true independent of EspressoDB.
If you launch a web server that accesses your database, everyone who can visit the web page can access the data by the means you have specified in your project. For example, it is possible to only allow the server to have read-only access to certain tables. For a more sophisticated discussion about web-access security see also the Django docs.
Q: How does EspressoDB help to ensure data integrity?
To reduce potential integrity violations, cross-checks are implemented on several layers:
Python side integrity checks EspressoDB provides automated (optional) consistency checks on tables and columns as well as integrity checks against the database to prohibit unwanted insertions. Table checks should be provided by the project developers.
Database side integrity checks This includes type checks (do not insert
stringsinintcolumns) and relation integrity checks (if you delete this entry, the related entry is updated).Database access checks (depending on the backend) Depending on the backend you can give different access rights to different users to allow, e.g., only read-only access to certain tables.
Data integrity goes hand-in-hand with access levels. The more access you allow, the more things could potentially go wrong. This statement is independent of EspressoDB. For this reason, we recommend to always have backups of your database.
Advanced features of EspressoDB
EspressoDB provides certain features which help navigating complex table relations. In this section we present
how consistency checks can be implemented to make it difficult to insert inconsistent data and
how tables can be written such that one can easily extend future scenarios.
Consistency checks
TL;DR
EspressoDB’s Base class implements two methods which run tests before inserting data into the database.
Before the database is touched (and unless specified differently)
the the instance’s
check_consistencymethod is called whenever a model issaved,created orupdated andthe instance’s
check_m2m_consistencyis called whenever a many-to-many column is changed.
On default, these methods are empty; overwriting the methods allows to run tests. For example,
class A(Base):
i = models.IntegerField()
def check_consistency(self):
if i < 0:
raise ValueError("`i` too small...")
A.objects.create(i=-2) # will fail
Note
These checks are not executed on bulk creation or update events.
The need for checks
For large scales projects it is important to rely on consistent data. Compared to simple file based solutions, SQL frameworks already provide powerful integrity cross checks in the form type checks and tracking of relations between different tables. Particularly for scientific projects, it is important for data to fulfill further constraints, like quantitative comparisons between different columns.
Depending on the complexity of consistency checks, a general SQL framework might not be sufficient and one can only leverage the ORM to run these cross checks. Picture the following scenario: One wants to store the location, filename, type and size of files in a table. If for a given type and filename, the file size is unexceptionally low, this might suggests that the file is broken. Once the table checks such cases before insertion and only inserts valid entries (or turn on a warning flag), one can increase consistency of records. Having sufficient consistency checks before insertion allows automating the data population without endangering consistency.
The basic idea of such checks is already present in Django’s ModelForms.
The difference to EspressoDB is that the user of EspressoDB is simultaneously a developer programmatically interacting with the database.
Thus EspressoDB extended the checks to programmatic insertions.
The basic idea
The checks are captured by Django’s signals.
E.g., the check_consistency method listens to each pre_save signal and check_m2m_consistency listens to m2m_changed.
These tests are intended to work before an object was created.
Thus you should not rely on the pk or id column of the to be tested instance when writing checks.
Disable checks
Each class comes with run_checks flag.
Set this flag to False to disable checks.
This can be either done on an instance or on the class (which will stop/start checks on all instances)
E.g., the below snippet will fail
a = A(i=-2) # no check_consistency call yet
a.save() # will fail
while the following snippet turns off checks and will succeed.
a.run_checks = False # or `A.run_checks` = False to set it for all future instances
a.save() # will run
Raised exceptions
The checks are wrapped with an exception block which catches the actual exception and raises an informative ConsistencyError.
This error carries information about the original exception and has a format message presenting information present at the test.
For example
a = A(i=-2)
raises
ConsistencyError: Consistency error when checking <class 'A'>.
ValueError:
`i` too small...
Data used for check:
* tag: None
* i: -2
Many-to-many checks
The general idea for many to many checks is analogue to the single instance checks. Different to this idea is that the many to many instances need to be created before storing their relation. Thus, this test is rather a test on association between different instances then an actual before creation test of individual instances (it checks consistency before insertion in the through table). E.g.,
class B(Base):
a_set = models.ManyToManyField(A)
a = A.objects.first()
b = B.objects.create() # runs check_consistency on b
b.a_set.add(a) # runs check_m2m_consistency on b with a
By default, check_m2m_consistency is empty.
To implement custom checks, one has to override the signature.
E.g.,
class B(Base):
a_set = models.ManyToManyField(A)
def check_m2m_consistency(self, instances_to_add, column):
if column == "a_set":
for a in instances_to_add:
if a.i > 2:
raise ValueError("A instance has too large i...")
b = B.objects.create() # runs check_consistency on b
a3 = A.objects.create(i=3) # runs check_consistency on a3
b.a_set.add(a3) # runs check_m2m_consistency on b with a3 and will fail
Because on default, ManyToMany fields are symmetric, it is in principle possible to run
a3.b_set.add(b)
EspressoDB implements consistency checks such that the check_m2m_consistency is always called on the instance that has implemented the ManyToManyField.
For example, the above call would result in
b.check_consistency(<QuerySet [<A: A[Base](i=3)>]>, column="a_set")
Calling add with multiple instances results in
> b.a_set.add(a1, a2)
b.check_consistency(<QuerySet [<A: A[Base](i=1)>, <A: A[Base](i=2)>]>, column="a_set")
and in the reverse case
> a3.b_set.add(b1, b2)
b1.check_consistency(<QuerySet [<A: A[Base](i=3)>]>, column="a_set")
b2.check_consistency(<QuerySet [<A: A[Base](i=3)>]>, column="a_set")
Pre-save functionality
TL;DR
EspressoDB’s Base class implements the .pre_save() method which is run before .check_consistency() and before inserting data into the database.
This functionality can be used to insert default values for columns that depend on runtime information.
Note
Similar to the .check_consistency() method, .pre_save() is not executed on bulk creation or update events.
Implementing a code version storage
The most prominent use case for employing a pre_save check is to store code revision information.
For example
def get_code_revision() -> str:
"""Extracts version of code which generates data by ...
"""
return ...
BAD_REVISIONS = ["v0.7.6a", "v99.99.1b"]
class Data(Base):
value = models.FloatField(help_text="Important number")
tag = models.CharField(max_length=200, help_text="Code revision")
def pre_save(self):
"""Populates the `tag` column with the code revision.
This method is run before updating the database.
"""
self.tag = get_code_revision()
def check_consistency(self):
"""Checks if code used for generating data is not part of a bad revision.
This is run after `pre_save` but before inserting in the database.
"""
if self.tag in BAD_REVISIONS:
raise RuntimeError(
f"You should not use revision '{self.tag}' for exporting data."
)
If a user now runs
Data(value=6.123).save()
the Data class will fill the tag field with get_code_revision() and only store entries if they are not part of BAD_REVISIONS.
Similar to .check_consistency(), .pre_save() can be disabled for the whole class or for a single instance by the run_pre_save attribute:
Data.run_pre_save = False # for all future instances
# or
instance = Data(value=1.23)
instance.run_pre_save = False # for only this instance
Automated cross-checks
In a production environment, it is important to ensure that each Python connection to the database has the same definition of tables as the database itself. This consistency can be ensured by automated checks which are run on the import of any EspressoDB project. To turn on these checks, you have to set the environment variable
export ESPRESSODB_INIT_CHECKS=1
If set, the following checks are executed:
Check if all model fields are reflected in the migration files
Check if local migration files agree with the (remote) database
If any of the checks fail, EspressoDB will quit.
Warning
The automated cross-checks were introduced in EspressoDB version 1.1.0.
If you have created a project with prior versions of EspressoDB, you have to update the project/__init__.py _init() function as specified in Updating default behavior.
Note
Checks are only run when importing an EspressoDB project.
The python manage.py command ignores cross-checks to allow applying migrations.
Updating default behavior
The check function espressodb.management.checks.run_all_checks() is called in the _init() function of each project/__init__.py. For example, the my_project/__init__.py file of the featured project runs checks as follows
def _init():
"""Initializes the django environment for my_project
"""
os.environ.setdefault("DJANGO_SETTINGS_MODULE", "my_project.config.settings")
_setup()
if os.environ.get("ESPRESSODB_INIT_CHECKS", "0") == "1":
from espressodb.management.checks import run_all_checks
try:
run_all_checks()
except Exception as error:
msg = "Failed to import EspressoDB project!\n\n"
msg += str(error)
msg += "\n\nYou are seeing this error because,"
msg += " on initialization, EspressoDB runs cross-checks."
msg += " If you want to disable this behavior, set the"
msg += " environment variable `ESPRESSODB_INIT_CHECKS=0`."
raise RuntimeError(msg)
This function is run whenever you import your project.
Note
The method run_all_checks() wraps check_model_state() and check_migration_state().
If you do not want to check the state of migrations all apps, you can provide a list of apps to exclude to check_migration_state().
Warning
EspressoDB projects before version 1.1.0 do not contain the above if statement.
Copy these lines in your project’s _init() function to allow automated checks.
This _init() function is the place where you can globally change the default behavior for checks.
For example, to turn on checks if the ESPRESSODB_INIT_CHECKS is not set, change the if condition to
if os.environ.get("ESPRESSODB_INIT_CHECKS", "1") != "0":
...
More complicated tables
This section explains how one can build tables such that they are extendable in the future. It is presented in the case of the example project.
In which scenario are they helpful
In science projects it is usually hard if not impossible to plan out each step at the beginning of a project. Thus it is important to stay flexible enough to incorporate unexpected changes – which, on first thought, is not along the notions of using relatively fixed tables.
Suppose you are in the scenario where you want to extend the previously coded up ContactHamiltoninan.
If it makes sense, you can add new columns and decide how previous entries in the tables, which where inserted without this new columns in mind, add default values.
Sometimes this is not enough – it would not make sense to adjust existing tables such that all new changes are present.
As an example, you would like to include a new Hamiltonian, e.g., corresponding to Coulomb interactions which are conceptually completely different from the ContactHamiltoninan.
But still you are interested in eigenvalue solutions which connection is hard coded to the ContactHamiltoninan by the hamiltonian foreign key.
A possible solution would be to code up the new CoulombHamiltoninan and introduce a new CoulombEigenvalue which hamiltonian foreign key points to the CoulombHamiltoninan.
class Coulomb(Base):
...
class CoulombEigenvalue(Base):
hamiltonian = models.ForeignKey(Coulomb, on_delete=models.CASCADE)
...
However, this now means that we have two Eigenvalue classes which represent the same thing and their only difference is the hamiltonian they point to
Eigenvalue -> Contact
CoulombEigenvalue -> Coulomb
A nicer solution would be if the eigenvalue point to a common base class, e.g., a Hamiltonian which is either a Coulomb or Contact Hamiltonian
Eigenvalue -> Hamiltonian <-> Contact
<-> Coulomb
This way, you will always have one eigenvalue class which generalizes to all ideas of an Hamiltonian class.
Implementation of common base
Warning
In this section we want to present the general idea for more complex tables.
It is in general difficult to completely reshape existing tables and therefore one should plan ahead!
To test the changes for this project, we recommend starting the database from scratch (e.g., remove the .sqlite file and my_project/hamiltonian/migrations files)
The implementation
Django already provides a framework for implementing such common base tables using inheritance. E.g., the most minimal setup for such a scenario would be
class Hamiltonian(Base):
pass
class Contact(Hamiltonian):
n_sites = models.IntegerField()
spacing = models.DecimalField(max_digits=5, decimal_places=3)
c = models.DecimalField(max_digits=5, decimal_places=3,)
class Meta:
unique_together = ["n_sites", "spacing", "c"]
class Coulomb(Hamiltonian):
n_sites = models.IntegerField()
spacing = models.DecimalField(max_digits=5, decimal_places=3)
v = models.DecimalField( max_digits=5, decimal_places=3)
class Meta:
unique_together = ["n_sites", "spacing", "v"]
class Eigenvalue(Base):
hamiltonian = models.ForeignKey(Hamiltonian, on_delete=models.CASCADE)
n_level = models.PositiveIntegerField()
value = models.FloatField()
class Meta:
unique_together = ["hamiltonian", "n_level"]
The Eigenvalue class now points to the Hamiltonian table and the Contact and Coulomb Hamiltonian classes now inherit from Hamiltonian.
The new classes can be used as before, e.g.,
h1 = Contact.objects.create(n_sites=10, spacing=0.1, c=-1)
h2 = Coulomb.objects.create(n_sites=10, spacing=0.1, v=20)
e1 = Eigenvalue.objects.create(hamiltonian=h1, n_level=1, value=-363.823)
e2 = Eigenvalue.objects.create(hamiltonian=h2, n_level=1, value=234.567)
Underlaying tables
Different to the base table, the Hamiltonian table is not abstract and thus will actually be created.
E.g., these models will create the following tables after migrating
hamiltonian_hamiltonian
| id | last_modified | tag | userid |
|---|---|---|---|
| 1 | ... | ... | ... |
| 2 ... | ... | ... | |
| ... | ... | ... | ... |
| 42 | ... | ... | ... |
| ... | ... | ... | ... |
The id column is the primary key to identify a certain entry.
All the other columns come from the EspressoDB Base class (which does not have it’s own table) to enable EspressoDB’s features and have additional meta information.
hamiltonian_contact
| hamiltonian_ptr_id | n_sites | spacing | c |
|---|---|---|---|
| 1 | 10 | 0.1 | -1 |
| 2 | 15 | 0.1 | -1 |
| ... | ... | ... | ... |
The specialized hamiltonian_contact table has no own id.
It uses the id column of the hamiltonian_hamiltonian table using the hamiltonian_ptr_id.
The other entries are specific to the actual implementation.
hamiltonian_coulomb
| hamiltonian_ptr_id | n_sites | spacing | v |
|---|---|---|---|
| 42 | 10 | 0.1 | -02 |
| ... | ... | ... | ... |
Similarly, the hamiltonian_coulomb borrows it’s primary key from the hamiltonian_hamiltonian table and adds information specific to it in it’s own table.
Thus, all implementations have a corresponding entry in the base hamiltonian_hamiltonian table but specific information in their own table.
hamiltonian_eigenvalue
| id | last_modified | tag | n_level | value | hamiltonian_id | userid |
|---|---|---|---|---|---|---|
| 1 | ... | ... | 1 | -363.823 | 1 | ... |
| 1 | ... | ... | 2 | -361.803 | 1 | ... |
| ... | ... | ... | ... | ... | ... |
Because the hamiltonian_eigenvalue table inherits from Base, it comes with the default Base columns.
In addition, it now points to the hamiltonian_id in the hamiltonian_hamiltonian table which corresponds to either a specialized Coulomb or Contact entry.
Unique constraints
Because both the Contact and Coulomb table have information about n_sites and spacing, it would actually be possible to move these information to the base Hamiltonian table.
This is generally possible and might also be good practice depending on the specific situation.
However, in case there are joined unique constraints, it might not always be possible because this constraint is enforced at the table level.
Suppose you want all the Contact entries to be unique in ["n_sites", "spacing", "c"].
If you place the additional columns n_sites and spacing from Contact to Hamiltonian and add an unique constraint in Hamiltonian according to ["n_sites", "spacing"],
class Hamiltonian(Base):
n_sites = models.IntegerField()
spacing = models.DecimalField(max_digits=5, decimal_places=3)
class Meta:
unique_together = ["n_sites", "spacing"]
class Contact(Hamiltonian):
c = models.DecimalField(max_digits=5, decimal_places=3)
class Meta:
unique_together = ["hamiltonian_ptr_id", "c"]
it is not possible to have table entries for same n_site and spacing but different c,
hamiltonian_hamiltonian
| id | n_sites | spacing | ... |
|---|---|---|---|
| 1 | 10 | 0.1 | ... |
| ... | ... | ... | ... |
hamiltonian_contact
| hamiltonian_ptr_id | c |
|---|---|
| 1 | -1.0 |
| 1 | -2.0 (this is not possible) |
because each entry in hamiltonian_contact creates a new id in hamiltonian_hamiltonian which is unique constrained in the parameters we want to have present.
In principle one could unique constrain ["id", "n_sites", "spacing"] in hamiltonian_hamiltonian, however unique constraining any combination of columns containing the id is equivalent to not constraining at all (because the id is supposed to be unique).
Queries and member access
In case of inheritance, queries and member access changes slightly.
E.g., if one wants to look up the corresponding Contact Hamiltonian of eigenvalues, one would have to use the following code
h = Eigenvalue.objects.filter(hamiltonian__contact__c=-1.0).first()
Or on the python level
e1 = Eigenvalue.objects.first()
h = e1.hamiltonian.contact # potentially none if hamiltonian not of type contact
h.c == -1.0
Note that this access might fail if the Hamiltonian is a Coulomb Hamiltonian.
To be save against this, EspressoDB provides the specialization attribute which identifies the type of the instance by it’s primary key, e.g.,
h0 = e1.hamiltonian.specialization
h0 == h
Furthermore, to avoid redundancy, EspressoDB provides convenience methods to circumvent the access of the specialization attribute. E.g., it is possible to use the syntax
e1 = Eigenvalue.objects.first()
h = e1.hamiltonian # no extra access to .contact
h.c == -1.0 # only present if h2 is of type contact, else it is .v
Note
Note that h is still an instance of Hamiltonian, it just loads in all the members of Contact.
When you change the members belonging to Contact, and call save, also the corresponding save of Contact is called.
Customizing EspressoDB
This section specifies your options to update EspressoDB’s appearance.
Admin page
By default, the espressodb.base.admin.register_admins() method.
This method is called in each apps admin.py.
For example my_project/hamiltonian/admin.py file looks like
from espressodb.base.admin import register_admins
register_admins("my_project.hamiltonian")
Adding the exclude_models keyword argument to the method, prevents rendering models in the admin page.
This feature can be used to customize your admin view for a specific model
from django.contrib.admin import register, ModelAdmin
from espressodb.base.admin import register_admins
from my_project.hamiltonian.models import Eigenvalue
# Render all but the Eigenvalue admin of my_project.hamiltonian using EspressoDB
register_admins("my_project.hamiltonian", exclude_models=["Eigenvalue"])
# Implement a custom admin for Eigenvalue
@register(Eigenvalue)
class NewEigenvalueAdmin(ModelAdmin):
pass
See also the Django admin reference for more details
On default, EspressoDB uses espressodb.base.admin.ListViewAdmin to render model admins.
You can change the default template by providing the admin_class keyword to espressodb.base.admin.register_admins().
API Reference of EspressoDB
EspressoDB splits up into 4 submodules
The core module of EspressoDB which provides default views and templates as well as the |
|
The documentations module provides a web page which summarizes the implemented models which derive from the EspressoDB |
|
The notification module provides a Python logging.Logger like class which stores and reads information to the database. |
|
The management module provides command line interface for EspressoDB. |
Module: espressodb
Initializes minimal settings to launch EspressoDB
-
init(**kwargs)[source]¶ Initializes minimal settings to launch EspressoDB without a project
Launches
django.conf.settings.configureand runsdjango.setup. This is needed to use EspressoDB command line tools.- Keyword Arguments
kwargs – Kwargs are fed to
settings.configure.
espressodb.base
Module: espressodb.base
The core module of EspressoDB which provides default views and templates as well as
the espressodb.base.models.Base class which replaces Django’s
models.Model to allow EspressoDB’s autorendering.
Helper classes for setting up an admin page on start |
|
This module provides the |
|
Custom exceptions used in EspressoDB |
|
Signal processing functions for the base class |
|
Contains url patterns for the base app. |
|
Views for the base module |
|
Static files for EspressoDB |
|
Utility functions for EspressoDB |
|
Template tags for the base module |
admin
Module: espressodb.base.admin
|
Extension to regular |
|
List view admin which displays all model fields. |
|
Tries to load all models from this app and registers |
Helper classes for setting up an admin page on start
-
class
BaseAdmin(model, admin_site)[source]¶ Extension to regular
admin.ModelAdminwhich storesuseras request logged in user on default.
-
class
ListViewAdmin(model, admin_site, **kwargs)[source]¶ List view admin which displays all model fields.
-
search_fields¶ The fields which are searchable on the admin page. Does only render fields which are present in
list_display
-
list_display¶ The fields to display as a column on the admin page. Defaults to
["id", "instance_name", ..., "tag"]where...are the model default fields.
-
list_display_links¶ The fields which will be a link to the detail view. Defaults to
["instance_name"]or["id"]or the first field inlist_display(if the previous option are not present inlist_display).
-
\*\*kwargs Kwargs for the parent init.
-
-
register_admins(app_name, exclude_models=None, admin_class=None)[source]¶ Tries to load all models from this app and registers
ListViewAdminsites.- Parameters
app_name (
str) – The name of the app.exclude_models (
Optional[List[str]]) – Models contained in this app which should not appear on the admin page. Uses the class name of the model.admin_class (
Optional[ModelAdmin]) – The admin model used to render the admin page. Defaults toListViewAdmin.
Calls
admin.site.register()for all models within the specified app.
exceptions
Module: espressodb.base.exceptions
|
Error which is raised during consistency checks. |
Custom exceptions used in EspressoDB
-
exception
ConsistencyError(error, instance, data=None)[source]¶ Error which is raised during consistency checks.
The consistency checks are called when a model is saved or created with the safe option. This Error wraps individual exceptions to provide more verbose information.
-
__init__(error, instance, data=None)[source]¶ Initialize consistency error and prepares custom error method.
- Parameters
error (
Exception) – The original Exception which was raised by the checkmodel – The model which raises the check
data (
Optional[Dict[str,Any]]) – The data the model was checked with.
-
__weakref__¶ list of weak references to the object (if defined)
-
models
Module: espressodb.base.models
Creates class and dependencies through top down approach from parameters. |
|
|
Overwrites user with login info if not specified and runs consistency checks. |
Method is called before save. |
|
Returns the specialization of the instance (children with the same id). |
This module provides the Base class which is an abstract model basis
providing default interfaces for espressodb.
-
class
Base(*args, **kwargs)[source]¶ The base class for the espressodb module.
This class provides api for auto rendering pages and recursive insertions.
-
__init__(*args, **kwargs)[source]¶ Default init but adds specialization attributes (which do not clash) to self
The specialization is a child instance of this class which has an id in the respective child table.
The specialization attributes are attributes present in the child but not in the current instance.
-
__setattr__(key, value)[source]¶ Tries to set the attribute in specialization if it is a specialized attribute and else sets it in parent class.
-
check_consistency()[source]¶ Method is called before save.
Raise errors here if the model must fulfill checks.
-
check_m2m_consistency(instances, column=None)[source]¶ Method is called before adding to a many to many set.
Raise errors here if the adding must fulfill checks.
-
clean()[source]¶ Calls super clean, check_consistency.
Consistency errors are wrapped as validation errors. This ensures consistencies are properly captured in form validations and do not raise errors berfore.
-
classmethod
get_app_doc_url()[source]¶ Returns the url tp the doc page of the app.
- Return type
Optional[str]- Returns
Url if look up exist else None.
-
classmethod
get_doc_url()[source]¶ Returns the url to the doc page.
- Return type
Optional[str]- Returns
Url if look up exist else None.
-
classmethod
get_open_fields()[source]¶ Returns list of fields for class which are editable and non-ForeignKeys.
- Return type
List[Field]
-
classmethod
get_or_create_from_parameters(calling_cls, parameters, tree=None, dry_run=False, _class_name=None, _recursion_level=0)[source]¶ Creates class and dependencies through top down approach from parameters.
- Parameters
calling_cls – The top class which starts the get or create chain.
parameters (
Dict[str,Any]) – The construction / query arguments. These parameters are shared among all constructions.tree (
Optional[Dict[str,Any]]) – The tree of ForeignKey dependencies. This specify which class the ForeignKey will take since only the base class is linked against. Keys are strings corresponding to model fields, values are either strings corresponding to classesdry_run (
bool) – Do not insert in database._class_name (
Optional[str]) – This key is used internaly to identified the specialization of the base object._recursion_level (
int) – This key is used internaly to track number of recursions.
Populates columns from parameters and recursevily creates foreign keys need for construction. Foreign keys must be specified by the tree in order to instanciate the right tables. In case some tables have shared column names but want to use differnt values, use the specialized_parameters argument. This routine does not populate many to many keys.
Example
Below you can find an example how this method works.
class BA(BaseB): b1 = IntegerField() b2 = IntegerField() class BB(BaseB): b1 = IntegerField() b2 = IntegerField() b3 = IntegerField() class C(BaseC): c1 = IntegerField() c2 = ForeignKey(BaseB) class A(BaseA): a = IntegerField() b1 = ForeignKey(BaseB) b2 = ForeignKey(BaseB) c = ForeignKey(BaseC) instance, created = A.get_or_create_from_parameters( parameters={"a": 1, "b1": 2, "b2": 3, "b3": 4, "c1": 5, "b2.b2": 10}, tree={ "b1": "BA", "b2": "BB", "c": "C", "c.c2": "BA" } )
will get or create the instances
a0 = A.objects.all()[-1] a0 == instance a0.a == 1 # key of A from pars a0.b1.b1 == 2 # a.b1 is BA through tree and a.b1.b1 is two from pars a0.b1.b2 == 3 a0.b2.b1 == 2 # a.b2 is BB through tree and a.b1.b1 is two from pars a0.b2.b2 == 10 # a.b2.b2 is overwriten by specialized parameters a0.b2.b3 == 4 a0.c.c1 == 5 # a.c is C through tree a0.c.c2.b1 == 2 # a.c.c2 is BA through tree a0.c.c2.b2 == 3
- Return type
Tuple[Base,bool]
-
classmethod
get_recursive_columns(tree=None, _class_name=None)[source]¶ Recursively parses table including foreign keys to extract all column names.
- Parameters
tree (
Optional[Dict[str,Any]]) – The tree of ForeignKey dependencies. This specify which class the ForeignKey will take since only the base class is linked against. Keys are strings corresponding to model fields, values are either strings corresponding to classes_class_name (
Optional[str]) – This key is used internaly to identified the specialization of the base object.
- Return type
Tuple[Dict[str,List[str]]]
-
get_specialization()[source]¶ Queries the dependency tree and returns the most specialized instance of the table.
- Return type
-
classmethod
get_sub_info(root_key, tree)[source]¶ Extracts the class name and sub tree for a given tree and key
- Parameters
root_key (
str) – The key to look up in the dictionarytree (
Dict[str,Any]) – The tree of ForeignKey dependencies. This specify which class the ForeignKey will take since only the base class is linked against. Keys are strings corresponding to model fields, values are either strings corresponding to classes
- Raises
TypeError – If the values of the dictionary are not of type string or Tuple
KeyError – If the key was not found in the dictionary
- Return type
Tuple[str,Optional[Dict[str,Any]]]
-
id¶ Primary key for the base class
-
last_modified¶ Date the class was last modified
-
pre_save()[source]¶ Method is called before save and before check consistency.
This method can be used to overwrite custom column values. It has access to all information present at the
.save()call.
-
save(*args, save_instance_only=False, **kwargs)[source]¶ Overwrites user with login info if not specified and runs consistency checks.
- Parameters
save_instance_only (
bool) – If true, only saves columns of the instance and not associated specialized columns.
Note
The keyword
save_instance_onlyandcheck_consistencyis not present in standard Django.- Return type
-
property
specialization¶ Returns the specialization of the instance (children with the same id).
If the class has no children which match the id, this will be the same object.
- Return type
-
tag¶ User defined tag for easy searches
-
user¶ User who updated this object. Set on save by connection to database. Anonymous if not found.
-
signals
Module: espressodb.base.signals
|
Runs pre save logic of Base class |
|
Runs many to many pre add logic of Base class |
Signal processing functions for the base class
Includes checks to run on save.
static
Module: espressodb.base.static
Static files for EspressoDB
Contained static file packages are
urls
Module: espressodb.base.urls
Contains url patterns for the base app. This includes the index view.
The URL-app name is base.
Name |
Path |
View |
|---|---|---|
index |
|
|
populate |
|
|
populate-result |
|
views
Module: espressodb.base.views
|
The default index view. |
|
View which guides the user in creating a nested model population script. |
|
View which presents the result of the population query process. |
Views for the base module
-
class
IndexView(**kwargs)[source]¶ The default index view.
-
template_name= 'index.html'¶ The used template file.
-
-
class
PopulationResultView(**kwargs)[source]¶ View which presents the result of the population query process.
This view generates a Python script which can be used to query or create nested models once the user has filled out columns in script.
-
get(request)[source]¶ Presents the population results.
Modifies the
session. E.g., thetodoandcolumnentries are deleted.
-
template_name= 'present-populate.html'¶ The used template file.
-
-
class
PopulationView(**kwargs)[source]¶ View which guides the user in creating a nested model population script.
This view queries which model the user wants to populate. If the model has Foreign Keys, it queries the user which table to select in case there are multiple options (in case there is just one, this table will be selceted).
The logic works as follows, the root table might depend on other tables which might depend on other tables as well. This defines a tree of tables where each ForeignKey of the current table column needs to be matched against possible table options. This view iterates user choices and queries the user for open column-table pairs.
This view uses the request
session(e.g, cookies) to store previously selected values. Thus there exist no unique link for the view.- The following keywords are used to identify the nested dependencies:
root- the model on top of the tree (e.g, the first choosen table)todo- tables which need to be specified by the user to parse the treetree- cloumn-tables pairs which have been specified by the user. The column name reflects recursice column names. See thecolumnkey.column- the current column name. This name might be a combination of nested column dependencies likecolumnA_columnBand so on.
Both the
todoandtreelists are odered such that models are created bottom up to create an executable script.Warning
The querying logic breaks if the user navigates backwards.
-
form_class¶ alias of
espressodb.base.forms.ModelSelectForm
-
get(request)[source]¶ Initializes from which queries the user about tables for population.
Initializes the
root,todo,treeandcolumnsessioncontext to empty values.
-
static
get_choice(form, session)[source]¶ Reads form and sets
rootmodel if not present insession.- Parameters
form (
ModelSelectForm) – The valid form.session (
Dict[str,Any]) – The current session. Will be updated ifroot is None.
- Return type
-
get_next(model, session, parse_tree=True)[source]¶ Updates the
todolist by working through present entries.- Parameters
model (
Base) – The currentcolumnmodel.parse_tree (
bool) – Adds possible user choices for dependencies of currentcolumnif True totodolist.session (
Dict[str,Any]) – The current session. Will be updated ifroot is None.
This method works the following way:
Add current select model to tree if present.
Parse the tree of the current model if
parse_treeusingespressodb.base.utilities.models.iter_tree().Update
todoif present (see below) else return (render result view).
The
todoupdate works as follows:Pop the first entry in the
todolist and add this entry tocolumnFind possible tables which can be chosen for this model. This modifies the
columncontext.If there is more then one choices, ask the user which model to select. This means returning back to the form query page.
Pick the only option if there is just one choice, and recursively call this method for this choice.
-
post(request, *args, **kwargs)[source]¶ Processes the selected model and prepares the next choices.
The
sessioncontext is modified in the following way:If the form is valid, extract the current column-table choice using
PopulationView.get_choice().Get the next column-table option the user has to specify using
PopulationView.get_next().Return a new column-table from for the user to answer if not done yet.
Redirect to
PopulationResultViewif there is nothing to do.
-
template_name= 'select-table.html'¶ The used template file.
utilities
Module: espressodb.base.utilities
Functions to identify project apps |
|
Help functions to inspect |
|
Incantations only a selected group of High Wizards can utilize. |
|
Markdown to html converter |
Utility functions for EspressoDB
apps
Module: espressodb.base.utilities.apps
|
Finds all apps which are part of the project. |
|
Returns a readable name for the app |
Creates a map for all project app names. |
Functions to identify project apps
-
get_app_name(app)[source]¶ Returns a readable name for the app
- Parameters
app (
AppConfig) – The app config.- Return type
str
-
get_apps_slug_map()[source]¶ Creates a map for all project app names. Keys are slugs, values are names.
- Return type
Dict[str,str]
-
get_project_apps(exclude_apps=None)[source]¶ Finds all apps which are part of the project.
- Parameters
exclude_apps (
Optional[Tuple[str]]) – Name of the apps to exclude. Must matchsettings.yamlspecification.
Iterates over apps specified in the settings.yaml file and returns django app configs if installed.
- Return type
List[AppConfig]
blackmagicsorcery
Module: espressodb.base.utilities.blackmagicsorcery
Incantations only a selected group of High Wizards can utilize.
markdown
Module: espressodb.base.utilities.markdown
Markdown to html converter
-
PATTERNS= {'`([^`]+)`': '<code>\\g<1></code>'}¶ Patterns for markdown to html conversion
models
Module: espressodb.base.utilities.models
|
Returns all installed project models which are not in the exclude list. |
|
Extracts all foreign keys of model and inserters them in list. |
Help functions to inspect espressodb.base.models.Base models.
-
get_espressodb_models(exclude_apps=None)[source]¶ Returns all installed project models which are not in the exclude list.
- Parameters
exclude_apps (
Optional[Tuple[str]]) – The apps to exclude.- Return type
Model
-
iter_tree(model, name=None)[source]¶ Extracts all foreign keys of model and inserters them in list.
Returns strings in flat tree format, e.g.,
model_column_A.model_column_B.- Parameters
model (
Base) – A child of the base model.name (
Optional[str]) – The (path) name of the model.
- Return type
List[Tuple[str,str]]- Returns
First element of tuple are name names of the foreign keys in format
{name}.{field.name}. Second element are the actual classes.
templatetags
Module: espressodb.base.templatetags
Additional in template functions for the base module. |
Template tags for the base module
base_extras
Module: espressodb.base.templatetags.base_extras
|
Renders all app page links |
|
Returns verbose descriptor of model field |
|
Renders fields to string. |
|
Renders a model population tree to Python code. |
Returns descriptive version string |
|
Returns descriptive db string |
|
Returns name of the project |
Additional in template functions for the base module.
Extract key from dictionary
- Parameters
dictionary (
Dict[str,Any]) – The dictionary to searchkey (
str) – The key to look up
See also: https://stackoverflow.com/a/8000091
- Return type
Any
Returns name of the project
- Return type
str
Returns descriptive db string
- Return type
str
Renders all app documentation page links
- Return type
List[Tuple[str,str]]- Returns
Context with keys
urlsanddocumentationwhere each value is a list of Tuples with the reverse url name and display name.
Ignores urls which do not result in a match.
Uses the template
documentation-links.html.
Returns verbose descriptor of model field
- Parameters
field (
Field) – The field to render.instance_name (
Optional[str]) – The name of model instance for which the fields are written. If given, automatically insert the value for FK fields. This assumes that the FK variables are defined before this class and follow the convention columnname1_columnname2_….
- Return type
str
Renders fields to string.
- Parameters
fields (
List[Field]) – The fields to render.instance_name (
Optional[str]) – The name of model instance for which the fields are written. If given, automatically insert the value for FK fields. This assumes that the FK variables are defined before this class and follow the convention column_name1_column_name2_….
Sorts fields by being optional or not.
- Return type
List[str]
Renders all app page links
- Parameters
exclude – The link names to exclude.
- Return type
List[Tuple[str,str]]- Returns
Context with keys
urlsanddocumentationwhere each value is a list of Tuples with the reverse url name and display name.
Ignores urls which do not result in a match.
Uses the template
link-list.html.Note
It is possible to give class based views the
exclude_from_navflag. If this flag is set, the view will not be rendered.
Renders a model population tree to Python code.
- Parameters
tree (
Dict[str,str]) – The column names ForeignKey dependency tree of the root model.root (
str) – The name of the root model.
- Return type
Dict[str,str]- Returns
Context containing the Python code unde key
content.
Uses the template
tree-to-python.html.
Returns descriptive version string
- Return type
str
espressodb.documentation
Module: espressodb.documentation
Contains url patterns for the documentation app |
|
Contains views for the documentation app. |
|
Template tags for the documentation module |
The documentations module provides a web page which summarizes the implemented models
which derive from the EspressoDB espressodb.base.models.Base class.
urls
Module: espressodb.documentation.urls
Contains url patterns for the documentation app
The URL-app name is documentation.
Name |
Path |
View |
|---|---|---|
details |
|
views
Module: espressodb.documentation.views
Contains views for the documentation app.
-
class
DocView(**kwargs)[source]¶ Renders the documentation page for apps present in EspressoDBs models.
Uses
espressodb.base.utilities.apps.get_apps_slug_map()to locate apps.-
get_context_data(**kwargs)[source]¶ Adds
app_namefrom slug and adds all app model slugs to conext.- Return type
Dict[str,Any]
-
template_name= 'doc-base.html'¶ The used template file.
-
-
SLUG_MAP= {}¶ Maps app-slugs to apps
templatetags
Module: espressodb.documentation.templatetags
Additional in template functions for the documentation module |
Template tags for the documentation module
documentation_extras
Module: espressodb.documentation.templatetags.documentation_extras
Additional in template functions for the documentation module
Renders documentation of model
- Parameters
app_slug (
str) – Slug of the app to be rendered. Usesespressodb.base.utilities.apps.get_apps_slug_map()to obtain app from app names.model_slug (
str) – Slug of the model to be rendered.
Uses the template
model-doc.html.
espressodb.notifications
Module: espressodb.notifications
Implements notifications similar to logging with optional viewer restrictions |
|
Views for notifications module. |
|
Contains url patterns for the notifications app |
|
Templatetags for the notifications module. |
The notification module provides a Python logging.Logger like class which stores and reads information to the database.
Example
The notfier works just like a Logger, e.g.,
notifier = get_notifier()
notifier.info("Hello world!", title="Test the notifier")
See also the espressodb.notifications.models.Notifier class for more
information.
-
get_notifier(tag=None, groups=None)[source]¶ Get a notifier instance.
- Parameters
tag (
Optional[str]) – The tag of the notification. Used for fast searches.groups (
Optional[List[str]]) – The user groups which are allowed to view this notfication. No groups means not logged in users are able to view the notfication.
- Return type
- Returns
A notifier instance
models
Module: espressodb.notifications.models
Implements notifications similar to logging with optional viewer restrictions
The purpose of this module is having logging like capabilities which can be accessed in web views. Mimicing logging messages, notifications have a content field, a timestamp and a level. To have control over what might be displayed on web views, the notifications come with additional optional features:
( |
|
( |
|
( |
|
( |
The notifications view will be rendered on default whenever a user is logged in.
The available notifications levels |
|
|
Model which implements logging like notification interface. |
|
Logger like object which interactions with the Notification model. |
-
LEVELS= ('DEBUG', 'INFO', 'WARNING', 'ERROR')¶ The available notifications levels
-
class
Notification(*args, **kwargs)[source]¶ Model which implements logging like notification interface.
The model is ordered according to timestamp in descending order.
-
exception
DoesNotExist
-
exception
MultipleObjectsReturned
-
add_user_to_read_by(user)[source]¶ Adds the user to the
Notification.read_bylist and inserts in the db.- Parameters
user (
User) – The user to check.
-
content¶ (
models.TextField) - The content of the notification
-
classmethod
get_notifications(user, level=None, show_all=False)[source]¶ Returns all notifications the user is allowed to see.
- Parameters
user (
User) – The user who wants to see notificationslevel (
Optional[str]) – The notification level to specialize. Shows notifications for all levels if not specified.show_all (
bool) – If True also shows already read messages
Results are order by timestamp in decreasing order.
- Return type
List[Notification]
-
groups¶ (
models.ManyToManyField->django.contrib.auth.models.Group) - The group of users who are allowed to read this notification
-
read_by¶ (
models.ManyToManyField->django.contrib.auth.models.User) - The users who have read the notification
-
tag¶ (
models.CharField) - A tag for fast searches
-
timestamp¶ (
models.DateTimeField) - Creation date of the notification
-
title¶ (
models.CharField) - The title of the notification
-
exception
-
class
Notifier(tag=None, groups=None)[source]¶ Logger like object which interactions with the Notification model.
Example
notifier = Notifier(tag="my_app", groups=["admin"]) notifer.debug("Set up notifier") notifier.info("Start to invesitgate app") ... notifier.error("ERROR! read this ...", title="NEED urgent attention!")
Note that
tagandgroupscan be overwriten by the kwargs of the notifier methods, e.g.,notifer.debug("Set up notifier", tag="set up")-
__init__(tag=None, groups=None)[source]¶ Init the Notifier class
- Parameters
tag (
Optional[str]) – The tag of the notification. Used for fast searches.groups (
Optional[List[str]]) – The user groups which are allowed to view this notfication. No groups means not logged in users are able to view the notfication.
-
debug(content, title=None, tag=None, groups=None)[source]¶ Creates notification at debug level.
- Parameters
content (
str) – The content of the notificationtitle (
Optional[str]) – The title of the notificationtag (
Optional[str]) – The tag of the notification. Used for fast searches. Overrides Notifier default tag.groups (
Optional[List[str]]) – The user groups which are allowed to view this notfication. No groups means not logged in users are able to view the notfication. Overrides Notifier default groups.
- Raises
KeyError – If groups are present but not found.
- Return type
-
error(content, title=None, tag=None, groups=None)[source]¶ Creates notification at error level.
- Parameters
content (
str) – The content of the notificationtitle (
Optional[str]) – The title of the notificationtag (
Optional[str]) – The tag of the notification. Used for fast searches. Overrides Notifier default tag.groups (
Optional[List[str]]) – The user groups which are allowed to view this notfication. No groups means not logged in users are able to view the notfication. Overrides Notifier default groups.
- Raises
KeyError – If groups are present but not found.
- Return type
-
static
get_groups_from_names(group_names)[source]¶ Parses the group names to
Groups.- Parameters
group_names (
List[str]) – List of group names which will be converted to a list ofespressodb.notifications.models.Notification.- Raises
KeyError – If not all groups are found.
- Return type
List[Group]
-
groups¶ The user groups which are allowed to view this notfication. No groups means not logged in users are able to view the notfication.
-
info(content, title=None, tag=None, groups=None)[source]¶ Creates notification at info level.
- Parameters
content (
str) – The content of the notificationtitle (
Optional[str]) – The title of the notificationtag (
Optional[str]) – The tag of the notification. Used for fast searches. Overrides Notifier default tag.groups (
Optional[List[str]]) – The user groups which are allowed to view this notfication. No groups means not logged in users are able to view the notfication. Overrides Notifier default groups.
- Raises
KeyError – If groups are present but not found.
- Return type
-
tag¶ The tag of the notification. Used for fast searches.
-
warning(content, title=None, tag=None, groups=None)[source]¶ Creates notification at warning level.
- Parameters
content (
str) – The content of the notificationtitle (
Optional[str]) – The title of the notificationtag (
Optional[str]) – The tag of the notification. Used for fast searches. Overrides Notifier default tag.groups (
Optional[List[str]]) – The user groups which are allowed to view this notfication. No groups means not logged in users are able to view the notfication. Overrides Notifier default groups.
- Raises
KeyError – If groups are present but not found.
- Return type
-
urls
Module: espressodb.notifications.urls
Contains url patterns for the notifications app
The URL-app name is notifications.
Name |
Path |
View |
|---|---|---|
notifications-list-debug |
|
|
notifications-list-info |
|
|
notifications-list-warning |
|
|
notifications-list-error |
|
|
notification-read |
|
views
Module: espressodb.notifications.views
|
View which displays notifications for logged in user and level. |
|
Post only view to add logged in user to has read list of notification. |
Views for notifications module.
-
class
HasReadView(**kwargs)[source]¶ Post only view to add logged in user to has read list of notification.
-
static
get(request, *args, **kwargs)[source]¶ Get accessed of view is removed.
- Raises
Http404 – When this function is called.
-
model
-
post(request, *args, **kwargs)[source]¶ Adds logged in user to read_by list of notfication if user is allowed to see it.
- Raises
Http404 – If user is not allowed to see notification.
- Return type
HttpResponseRedirect
-
success_url¶ Go back to notification list view on success
-
static
-
class
NotificationsView(**kwargs)[source]¶ View which displays notifications for logged in user and level.
-
get_context_data(*, object_list=None, **kwargs)[source]¶ Parses context data of view.
Sets context view
levelto own view level. Sets contextalloption to true if specified as url parameter.
-
get_queryset()[source]¶ Returns notifications which are vieawable by logged in user for current level.
- Return type
Union[QuerySet,List[Notification]]
-
level= ''¶ Level of notifications to show. Must be one of
espressodb.notifications.models.LEVELS. Shows notifications for all levels if not specified.
-
login_url= '/login/'¶ Redirect user to login page if not logged in
-
model
-
paginate_by= 20¶ Paginate pages by
-
template_name= 'notification_list.html'¶ The template file
-
templatetags
Module: espressodb.notifications.templatetags
Templatetags for the notifications module.
Additional in template functions for the notifications module. |
notifications_extras
Module: espressodb.notifications.templatetags.notifications_extras
|
Maps logging levels to bootstrap levels. |
|
Renders notifications |
Renders notification links. |
Additional in template functions for the notifications module.
Maps logging levels to bootstrap levels. Defaults to light.
- Parameters
level (
str) – The logging level.- Return type
str
Renders notifications
- Parameters
notification (
Notification) – The notification.hide_close (
bool) – Hide the has read button in view for this notfication.
Uses template
espressodb/notfications/templates/render_notification.html.- Return type
Dict[str,Any]
Renders notification links.
- Parameters
user (
User) – The currently logged in user.
Also adds informations about notifications which are viewable by user.
Uses template
espressodb/notfications/templates/render_notification_links.html.
espressodb.management
Module: espressodb.management
The management module provides command line interface for EspressoDB.
The utilities submodule provides access to file or repo based EspressoDB information |
|
Checks for the state of local migration files and models compared to database |
|
Provides |
The startapp and startproject templates are located in espressodb/management/templates.
utilities
Module: espressodb.management.utilities
The utilities submodule provides access to file or repo based EspressoDB information
Functions for identifying files relevant for EspressoDB. |
|
Provides package settings variables needed by espressodb. |
|
Tools to keep track of the current repository version and database. |
files
Module: espressodb.management.utilities.files
|
Reads the settings file for given project and performs checks. |
|
Reads the db settings file for given project and performs checks. |
Root directory of the EspressoDB installation |
Functions for identifying files relevant for EspressoDB.
-
get_db_config(root_dir)[source]¶ Reads the db settings file for given project and performs checks.
Expects to find the keys
ENGINEandNAME.- Parameters
root_dir (
str) – The root directory of the project.- Return type
Dict[str,str]- Returns
Database settings found in settings file.
- Raises
ImproperlyConfigured – If not all of the essential keys are set.
-
get_project_settings(root_dir)[source]¶ Reads the settings file for given project and performs checks.
Expects to find the keys
SECRET_KEY,DEBUG,ALLOWED_HOSTSandPROJECT_APPS.- Parameters
root_dir (
str) – The root directory of the project.- Return type
Dict[str,Any]- Returns
Settings found in settings file.
- Raises
ImproperlyConfigured – If not all of the essential keys are set.
-
ESPRESSO_DB_ROOT= 'path/to/espressodb'¶ Root directory of the EspressoDB installation
settings
Module: espressodb.management.utilities.settings
Provides package settings variables needed by espressodb.
Raises ImproperlyConfigured errors if variables are not found.
-
PROJECT_APPS: List[str] = []¶ List of apps used in the project. Will be added to Django’s
INSTALLED_APPS
-
ROOT_DIR= 'path/to/current/project/root'¶ Root directory of the current project
-
PROJECT_NAME= 'my_project'¶ Name of the current project. Must match the name of the project Python module
version
Module: espressodb.management.utilities.version
Tools to keep track of the current repository version and database.
-
get_db_info()[source]¶ Extract database informations from the settings.
- Return type
Tuple[Optional[str],Optional[str]]- Returns
The name of the db and the name of the db user if found.
Note
.sqlitedatabases do not specify a user.
-
get_repo_version()[source]¶ Finds information about the EspressoDB repository if possible.
Only works if EspressoDB is installed from the github repository.
- Return type
Tuple[Optional[str],Optional[str]]- Returns
The branch and the git tag-commit version as strings if found. If not installed (and symlinked from the repo), returns the PyPi version.
checks
Module: espressodb.management.checks
Checks for the state of local migration files and models compared to database
-
run_all_checks()[source]¶ Runs all checks and raises check specific error in case script fails
- The order of checks are:
Cross checks for local migrations and models compared to state of database |
migrations
Module: espressodb.management.checks.migrations
Cross checks for local migrations and models compared to state of database
-
exception
MigrationStateError(header, data=None)[source]¶ Error which is raised if the local state of models or migrations does not reflect the database.
-
__init__(header, data=None)[source]¶ Initialize MigrationStateError and prepares custom error method.
- Parameters
header (
str) – What is the reason for raising the error? E.g., changes, conflicts, …data (
Optional[Dict[str,List[str]]]) – Dictionary where keys are app names and values are migration names.
-
-
check_migration_state(exclude=None)[source]¶ Checks if the state of local migrations is represented by the database.
This code follows the logic of Djangos showmigrations https://github.com/django/django/blob/master/django/core/management/commands/showmigrations.py
- Parameters
exclude (
Optional[List[str]]) – List of apps to ignore when checking migration states.- Raises
MigrationStateError – If the loader detects conflicts or unapplied changes.
- Future:
It might be desirable to allow partial checks by, e.g., providing an app_labels argument.
-
check_model_state()[source]¶ Checks if the state of local models is represented by migration files.
This code follows the logic of Djangos makemigrations https://github.com/django/django/blob/master/django/core/management/commands/makemigrations.py
- Raises
MigrationStateError – If the loader detects conflicts or unapplied changes.
- Future:
It might be desirable to allow partial checks by, e.g., providing an app_labels argument.
-
run_migration_checks()[source]¶ Runs all migration checks at once
- In order:
- Raises
MigrationStateError – If the loader detects conflicts or unapplied changes.
commands
Module: espressodb.management.management.commands
Provides manage.py (and thus espressodb) command line arguments.
Script to return EspressoDB and database version info. |
|
Starting app interface for EspressoDB. |
|
Overrides default startproject command to match new folder layout |
info
Module: espressodb.management.management.commands.info
Script to return EspressoDB and database version info.
-
class
Command(stdout=None, stderr=None, no_color=False, force_color=False)[source]¶ Prints espressodb version and db access infos
Uses
espressodb.management.utilities.version.get_repo_version()andespressodb.management.utilities.version.get_db_info().
startapp
Module: espressodb.management.management.commands.startapp
Starting app interface for EspressoDB.
-
class
Command(stdout=None, stderr=None, no_color=False, force_color=False)[source]¶ Start a new application in the project base dir (
ROOT_DIR/PROJECT_NAME).See also
espressodb.management.utilities.settings.ROOT_DIRandespressodb.management.utilities.settings.PROJECT_NAMEThe default app layout is (see also the templates.)
{PROJECT_NAME}/ |-- {APP_NAME}/ |-- __init__.py |-- admin.py |-- apps.py |-- models.py |-- tests.py |-- views.py |-- templates/ |-- migrations/ |-- __init__.py
Important
EspressoDB requires this layout for import statements and static/template path finding.
Note
This command overrides default startapp command to match new folder layout.
-
validate_name(name, *args, **kwargs)[source]¶ This Override of validate_name disables the import_module check which was implemented on django commit fc9566d42daf28cdaa25a5db1b5ade253ceb064f or ticket https://code.djangoproject.com/ticket/30393#no1 (TemplateCommand.handle calls validate name on the target directory).
-
startproject
Module: espressodb.management.management.commands.startproject
Overrides default startproject command to match new folder layout
-
class
Command(stdout=None, stderr=None, no_color=False, force_color=False)[source]¶ Start a new project.
See also
espressodb.management.utilities.settings.ROOT_DIRandespressodb.management.utilities.settings.PROJECT_NAMEThe default project layout is (see also the templates.)
{ROOT_DIR}/ |-- manage.py |-- db-config.yaml |-- settings.yaml |-- setup.py |-- {PROJECT_NAME}/ |-- __init__.py |-- config/ |-- __init__.py |-- settings.py |-- tests.py |-- urls.py |-- wsgi.py |-- migrations/ |-- __init__.py |-- notifications/ |-- __init__.py |-- 0001_initial.py
Important
EspressoDB requires this layout for import statements and static/template path finding.
Note
This command overrides default startproject command to match new folder layout.
Summary of EspressoDB functionality
URLs
If you have created you project using EspressoDB, the default project url config includes the app url name spaces as
urlpatterns = [
path("", include("espressodb.base.urls", namespace="base")),
path("admin/", admin.site.urls),
path("login/", auth_views.LoginView.as_view(template_name="login.html"), name="login"),
path("logout/", auth_views.LogoutView.as_view(), name="logout"),
path(r"documentation/", include("espressodb.documentation.urls", namespace="documentation")),
path(r"notifications/", include("espressodb.notifications.urls", namespace="notifications")),
]
Module: espressodb.base.urls
Contains url patterns for the base app. This includes the index view.
The URL-app name is base.
Name |
Path |
View |
|---|---|---|
index |
|
|
populate |
|
|
populate-result |
|
Module: espressodb.documentation.urls
Contains url patterns for the documentation app
The URL-app name is documentation.
Name |
Path |
View |
|---|---|---|
details |
|
Module: espressodb.notifications.urls
Contains url patterns for the notifications app
The URL-app name is notifications.
Name |
Path |
View |
|---|---|---|
notifications-list-debug |
|
|
notifications-list-info |
|
|
notifications-list-warning |
|
|
notifications-list-error |
|
|
notification-read |
|
Templatetags
Module: espressodb.base.templatetags.base_extras
Additional in template functions for the base module.
-
get_item(dictionary, key)[source] Extract key from dictionary
- Parameters
dictionary (
Dict[str,Any]) – The dictionary to searchkey (
str) – The key to look up
See also: https://stackoverflow.com/a/8000091
- Return type
Any
-
project_name()[source] Returns name of the project
- Return type
str
-
render_db_info()[source] Returns descriptive db string
- Return type
str
-
render_documentation_links()[source] Renders all app documentation page links
- Return type
List[Tuple[str,str]]- Returns
Context with keys
urlsanddocumentationwhere each value is a list of Tuples with the reverse url name and display name.
Ignores urls which do not result in a match.
Uses the template
documentation-links.html.
-
render_field(field, instance_name=None)[source] Returns verbose descriptor of model field
- Parameters
field (
Field) – The field to render.instance_name (
Optional[str]) – The name of model instance for which the fields are written. If given, automatically insert the value for FK fields. This assumes that the FK variables are defined before this class and follow the convention columnname1_columnname2_….
- Return type
str
-
render_fields(fields, instance_name=None)[source] Renders fields to string.
- Parameters
fields (
List[Field]) – The fields to render.instance_name (
Optional[str]) – The name of model instance for which the fields are written. If given, automatically insert the value for FK fields. This assumes that the FK variables are defined before this class and follow the convention column_name1_column_name2_….
Sorts fields by being optional or not.
- Return type
List[str]
-
render_link_list(exclude='', 'populate', 'populate-result', 'admin', 'documentation')[source] Renders all app page links
- Parameters
exclude – The link names to exclude.
- Return type
List[Tuple[str,str]]- Returns
Context with keys
urlsanddocumentationwhere each value is a list of Tuples with the reverse url name and display name.
Ignores urls which do not result in a match.
Uses the template
link-list.html.Note
It is possible to give class based views the
exclude_from_navflag. If this flag is set, the view will not be rendered.
-
render_tree(tree, root)[source] Renders a model population tree to Python code.
- Parameters
tree (
Dict[str,str]) – The column names ForeignKey dependency tree of the root model.root (
str) – The name of the root model.
- Return type
Dict[str,str]- Returns
Context containing the Python code unde key
content.
Uses the template
tree-to-python.html.
-
render_version()[source] Returns descriptive version string
- Return type
str
Module: espressodb.documentation.templatetags.documentation_extras
Additional in template functions for the documentation module
-
render_documentation(app_slug, model_slug)[source] Renders documentation of model
- Parameters
app_slug (
str) – Slug of the app to be rendered. Usesespressodb.base.utilities.apps.get_apps_slug_map()to obtain app from app names.model_slug (
str) – Slug of the model to be rendered.
Uses the template
model-doc.html.
Contributing to EspressoDB
Thank you for considering contributing to EspressoDB. On this page, we line out of how to best help out. And of course, please make sure you are welcoming and friendly (see also the Python community code of conduct).
Guiding principles
EspressoDB is an open-source project which intends to simplify others (programming) live. At best, an EspressoDB user should not worry about details behind the scenes; but if required, they should know what to do to adjust their EspressoDB project to their needs. For this reason, it is one of our guiding principles to stay close to Django. This allows utilizing existing functionality, resources and staying compatible as much as possible.
Because Django comes with a vast amount of documentation and has rich community support, it might be that the questions you have concerning EspressoDB are already explained in the resources on Django. If you think that this is not the case, feel free to reach out.
What we are looking for
EspressoDB is currently used in a few projects specific to our community. To extend its usability, providing feedback on how you use EspressoDB and how it could simplify your life are valuable to us. Whether it concerns the documentation or the software itself, if you believe you have ideas on how to improve EspressoDB, please reach out.
Community: questions & discussions
If you have questions, feel unsure about filing an issue, or rather want to discuss your concerns first, feel free to contact us on https://groups.google.com/forum/#!forum/espressodb.
Filing issues
If you find a potential bug, do not hesitate to contact us and file an issue—we will try to address it as soon as possible. But also if you feel you have an idea for potential improvement, we welcome issues on feature requests and enhancements.
Filing Bugs
When filing a bug report, please let us know:
What is your Python, Django and EspressoDB version?
What did you do?
What did you expect to see?
What did you see instead?
Your first contribution
We do appreciate help in form of pull requests —just take a look at open issues and try identifying a problem you might be able to help out with. Before you submit pull requests, please make sure the tests work.
Tests
To run all tests you have to install the development requirements on top of EspressoDB
pip install -r requirements-dev.txt
Because EspressoDB is used to create other projects, the tests should check whether features of EspressoDB work and also new projects can be initiated as expected. For this reason, we use a Makefile on top of the regular testing framework. You can run the tests with
make test
Preferred style of code
We try to follow PEP8 as much as useful (see also Pylint). In this context, we also appreciate formatting along the lines of black—the uncompromising Python code formatter.
Versioning
EspressoDB follows Semantic Versioning 2.0.0 (MAJOR.MINOR.PATCH).
Branches start with a v, e.g., v1.1.0 and once merged into master will obtain the previous branch name as a tag.